Custom Search Forms are NOT widgets. Custom search forms are created by you, using your own CSS and HTML.
By creating your own search forms in HTML, you can create a completely custom search experience, meeting your own needs for design, styling and search capabilities.
Wix: Does not apply to Wix
Also see these additional articles:
- Custom search form helpers - for some additional methods to use
- Search fields for your MLS
Requirements
- Buying Buddy Plugin: This must be correctly installed as all examples rely on the core Buying Buddy CSS and JavaScript.
- jQuery: If you use any of the Search Form Helpers, these require jQuery. Make sure jQuery is loaded on your website. If not, add it using:
<script src="https://ajax.googleapis.com/ajax/libs/jquery/3.2.1/jquery.min.js"></script> - You can check if jQuery is loaded by running the following script:
<script>
window.onload = function() {
    if (window.jQuery) { alert('jQuery is loaded');}
    else { alert('jQuery is not loaded'); }
}
</script> - Account API Key: Ensure your Account API Key is used to authenticate your form. You can find this in your Buying Buddy account under Account Settings.
Code Structure
- HTML Wrapper: Use
<div id="MBBv3Form...">as the wrapper around your form. Each form must have a unique ID (e.g.,MBBv3Form1,MBBv3Form_custom). - CSS: The styling on the examples is handled either by by the Buying Buddy CSS library, but you can add custom styles as needed.
- JavaScript: Ensure all additional JavaScript is properly wrapped for jQuery. For non-WordPress sites that don’t use the
my-buyingbuddy.jsfile, ensure the correct jQuery wrap is included:jQuery(document).on("mbb-widgets-loaded",function(){
// Custom JavaScript code here
});
All JavaScript samples shown in CodePen use this jQuery wrap.
Parameters to Customize
- CodePen examples are not ready-made widgets. You must modify them.
- MLS ID: Replace
mls_id=demowith your actual MLS ID.
This is the Buying Buddy mls_id for your MLS- e.g "ca45"
This can be found by using Widgets > Wizard, in your Buying Buddy dashboard. - Field names and values: Ensure that all form fields and values align with those supported by your MLS. You can verify the correct values by inspecting the source code of a standard search widget or using the Widget Wizard to inspect generated filters.
- Account API Key: Replace the sample API key with your actual API key found in your account settings.
Adding CAPTCHA for Spam Protection
You can include CAPTCHA in your form to enhance security. This typically involves adding an image and input field combination to your form’s HTML.
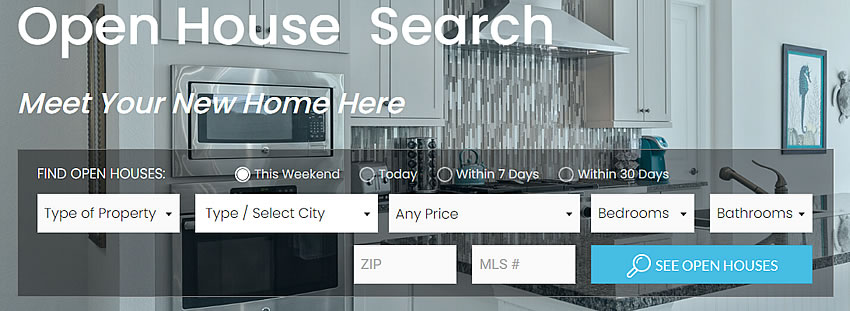
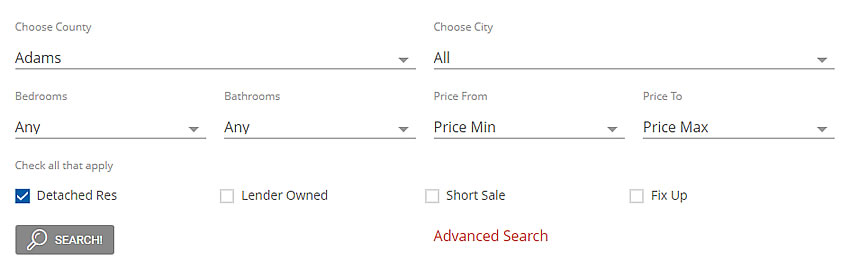
Screenshots of Example Forms
Here are some basic examples of custom search forms:
Instructions
Step 1
Ensure the Buying Buddy plugin is loading in the <head> section of your web page.
Step 2
Create the HTML for your form.
The diagram below indicates the main HTML components needed.

- The best way (currently) to discover the field names and values to use in your form code, is to look at the source code behind the standard Buying Buddy Search Widget on your website. By inspecting this, you will see all the names of fields and all the associated values that are permitted.
- YOU MUST INCLUDE THE BUYING BUDDY "MLS_ID" as a hidden field or the form will not work correctly.
<input name="mls_id" value="[mls_id]"] - You can also discover all field names and values by using the Wizard (go to Widgets > Wizard) in your Buying Buddy account and then inspecting the filter that is created.
This will show mls_id, names, values etc. - If you get stuck, then please contact the help desk
Step 3
Make sure of the following:
- The HTML
<form>tag also includes an "id", where "id" is a unique short name to identify this specific form.
For example:<form id="Form-1" > - You MUST include a hidden field "mls_id" referring to your MLS.
For example:<input type="hidden" name="mls_id" value="denver" />
Step 4
Your form submit option must use an <input> tag with type="button".
- This submission
<input>tag must have anonclick=parameter as shown below.
Make sure you format it correctly!
The "onclick" has the ID of your form, and the URL of your specified Search Results page (or any page where you have a Search Results or Display Widget).
For example:
<input name="submit" type="button" onclick="MBBv3_SubmitCustomSearchForm('Form-1','http://www.charliesmithrealty.com/results');" value="Search!" />
Code Samples
See the Custom Search Form collection on Codepen.
Notes for Website Types
Squarespace
- Add HTML
Create your custom form in HTML and then add to your Squarespace site by adding to a Code block. - Add any JavaScript
If you use any JavaScript form helpers that we provide, these use jQuery.
Both the jQuery and the JavaScript helper script should be added to the Code Injection area for JUST this page (go to Page Settings > Advanced ). - Add CSS
Custom CSS can be added to either apply site-wide, or just on the page with the form.
To add site-wide, go to Pages > Website Tools > Custom CSS.
To apply to just one page, add custom CSS in <style> tags above the Form HTML in the Code block you added.