This tutorial will show you how to adjust the widget on this page to show only listings you want displayed.
E.g. Your listings, your office listings, homes in an area, homes with a certain price, features and so on.
The "Featured Listings" page was automatically created and added to your menu when you installed the Buying Buddy App.
If you do not want this page then you can remove it from the menu, but it cannot be deleted.
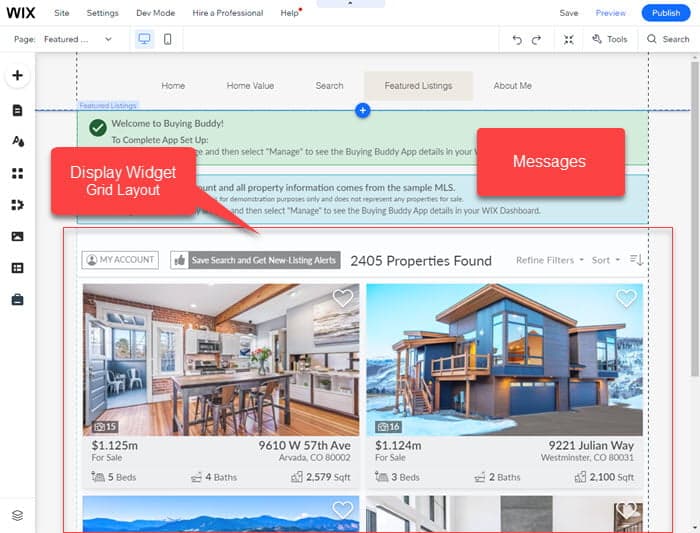
What's on this Featured Listings Page?
In the Editor, the Featured Listings page shows the following:
- The Grid Layout display widget.
This will fill the space available. The layout adjusts to fit device screen sizes.The widget will display properties selected from our demonstration MLS. - The widget has a default filter with 4 values:
- Minimum Price: $400k
- Maximum Price: $1m
- Minimum Bedrooms: 2
- Minimum Bathrooms: 2
- Buying Buddy account messages.
These are shown above the widget. Messages are only displayed in the editor, they do not appear on live published pages.
How to Show Only Listings You Want Displayed
Add a "filter" to select the listings you want to show and set options for the widget.
There are 2 steps to change the filter:
- Use the Widget Wizard to create a new filter
- Copy-and-paste the new filter into the Settings for the widget.
1. Use the Wizard to create a new filter
- Open the Buying Buddy App Dashboard by clicking the Buying Buddy widget, and then select the "Manage" button at the top.

- On the App Dashboard, scroll down to find and click the button to go to the "Widget Wizard".
- Then select one of the 3 options to display properties. On the next step choose the "grid" layout (as this is the widget to be updated).
- Continue through the wizard selecting any of the filter options available that can include: MLS fields, property status, listing agent, listing office and more.
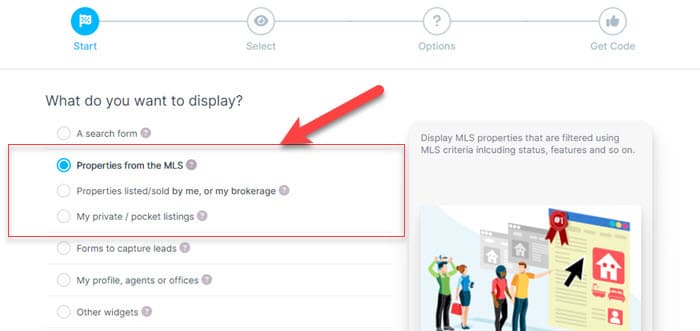
- On the final step of the Wizard, select the "Get Filter" tab and copy the filter to your clipboard.
Note: You could also use the "Add Widget" tab to add a whole new widget to your site.
2. Update the Widget with this new filter
- Return to the Featured Listings page in your Wix Editor.
Click the Buying Buddy widget and then the "Settings" button to show the settings panel for this widget. - In the settings panel, click the "Settings" tab on the left to show the "Widget Filter" field.

- Place your cursor in this field, which should be empty.
Then, paste (CTRL + V) in your new filter from your clipboard and exit the settings panel.
Your widget will now refresh and display listings based on your new filter.
Note: If you repeat this process later, make sure to delete any existing filter values before adding the new filter.
Ideas for Doing More
- Create multiple landing pages with properties
- Repeat the approach above to create additional hotsheet or landing pages that focus on your active, sold, neighborhoods and so on.
- Use the Widget Wizard to add new widgets with filters to your website.