
Every widget you create with the Widget Wizard is stored in your Buying Buddy account as a Saved Widget, with its own ID. Your Wix website uses that ID to load the widget's settings. Because the settings live in your Buying Buddy account, you can change what a widget shows - price range, areas, listing agent, layout and more - without opening the Wix editor.
In short: Create widgets with the Wizard, find them under , and connect a Wix widget to a saved widget by entering id:1234 (your widget's ID) in the Wix Widget Filter field. Any later change to the saved widget shows up on your website right away.
How Saved Widgets Work

One Saved Widget, Managed in One Place
The Wix widget points to the settings stored in your Buying Buddy account
- The Wizard saves your widget. When you finish the Widget Wizard, the widget is saved to your Buying Buddy account and given an ID, for example
1234. - The Wix widget refers to that ID. In Wix, each Buying Buddy widget has a Widget Filter field in its settings. When it contains
id:1234, the widget uses saved widget 1234. - Changes apply right away. When you edit saved widget 1234 in your Buying Buddy account, every Wix widget that uses
id:1234shows the change straight away. You don't need to open the Wix editor or republish your site.
Example: Your "Featured Listings" page shows homes from $400k to $1m. Prices in your market go up, so you open the saved widget in your Buying Buddy account and change the range to $500k to $1.2m. Your Featured Listings page now shows the new price range, and you never opened Wix.
Create a New Widget and Add It to Wix
Always create new widgets with the Widget Wizard. At the end of the Wizard, your widget is saved and added to your Wix website in one step.
1
Open the Widget Wizard
Start from the Buying Buddy App Dashboard in your Wix editor
- In your Wix editor, click any Buying Buddy widget, then click the Manage button to open the Buying Buddy App Dashboard.
- Scroll down and click the button to open the Widget Wizard.
- Follow the steps in the Wizard. Choose the type of widget, then set any filter options you want, such as MLS areas, price, property type, status, listing agent or listing office.
2
Name and Save Your Widget
A clear label makes the widget easy to find later
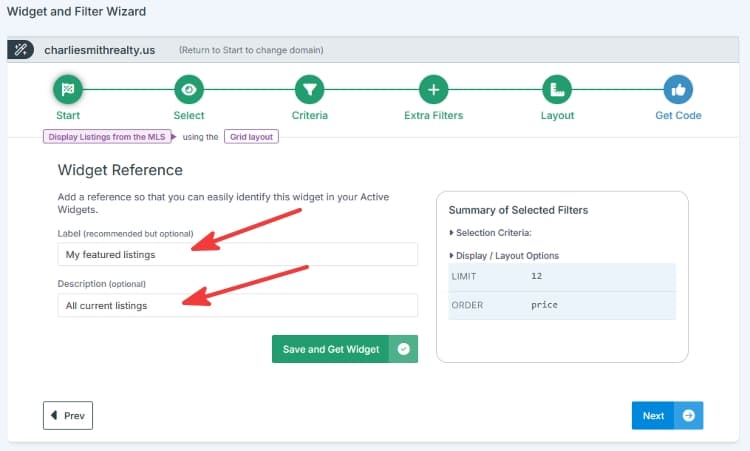
Near the end of the Wizard, you are asked for a Label and a Description for your widget. Both are optional, but we recommend adding a label that says what the widget shows and where it is used.
- Label example: Featured Listings Page - My Active Listings
- Description example: Grid of my active and pending listings, shown on /featured-listings
Save to continue to the final step.
3
Add the Widget to Wix
The widget is added to your home page, ready to move
- On the final panel, on the Add Widget tab, click Add Widget to Wix Home Page.
- Wait a few moments. The new widget appears on your home page in the Wix editor. Its Widget Filter field already contains the saved widget ID, for example
id:1234. - To move the widget to another page, right-click it and choose Cut. Go to the page you want, right-click the page background and choose Paste.
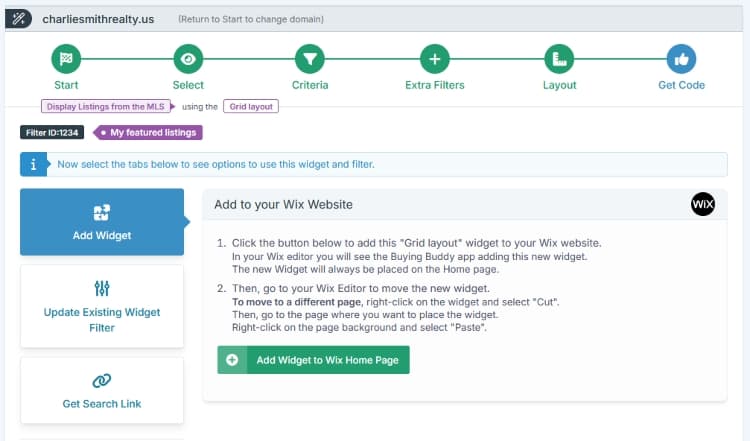
Tip: Want the new settings on a widget that is already on your site instead? Open the Update Existing Widget Filter tab on the final panel, copy the id:1234 value with the blue copy button, then follow the steps in the next section.
Use a Saved Widget on a Wix Widget
Use these steps to connect any Buying Buddy widget in Wix to a saved widget. For example, you might update an older widget, or set up a widget you added with the Wix Add-Ons option (see How to Add a Widget to your Wix Website).
1
Find the Saved Widget ID
All your saved widgets are listed in your Buying Buddy account
- Log in to your Buying Buddy account.
- Go to .
- Find your widget by its label or description and note its ID.

2
Enter the ID in the Wix Widget Settings
Type the ID into the Widget Filter field
- In your Wix editor, click the Buying Buddy widget to select it.
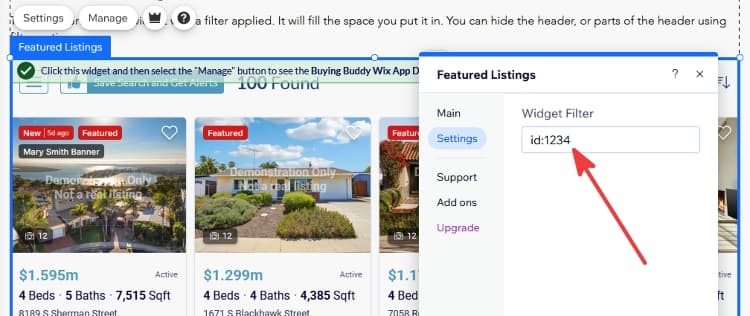
- Click the Settings button for the widget (usually shown above the widget). The Settings panel opens.
- Click the Settings tab on the left of the panel to show the Widget Filter field.
- Delete everything in the field, then type
id:followed by your saved widget ID. - Close the Settings panel to save. The widget refreshes and shows your saved widget.
For saved widget 1234, the Widget Filter field should contain exactly:
id:1234
Important: Type the ID exactly as shown, with no spaces: id:1234, not id: 1234. Make sure nothing else is left in the field.
Edit a Saved Widget
To change what a widget shows on your Wix website, edit the saved widget in your Buying Buddy account. You don't need to make any change in Wix.
1
Open the Saved Widget
Find the widget in your Saved Widgets list
- Go to .
- Find the widget you want to change. If you're not sure which one it is, check the Widget Filter field for that widget in Wix to see its ID.
- Click the edit icon for that widget.
2
Make Your Changes and Save
Use the Wizard, or edit the filter manually
- Edit with the Wizard (recommended): The Wizard opens with your current settings. Step through it, change what you need and save.
- Edit manually (advanced users): Change the filter text directly and save.
Caution: Manual changes are not checked for errors. A typo can stop the widget from showing correctly on every page that uses it. If you're not sure, use the Wizard.
Done: Your changes take effect right away. Refresh your published website to see the updated widget.
Common Questions
Can I use the same saved widget on more than one page?
Yes. Enter the same id:1234 in as many Wix widgets as you like. When you edit the saved widget, all of them update together. If you want one page to show something different, create a separate saved widget for it.
My widget's Widget Filter field contains long filter text, not an ID. What should I do?
Older widgets may hold the full filter text instead of a saved widget ID. They still work, but you have to change them in the Wix editor. To switch to a saved widget, use the Wizard to create a widget with the same settings. Then, on the Update Existing Widget Filter tab, copy the id:1234 value and replace the contents of the Widget Filter field with it. From then on, you can make changes under .
I edited a saved widget, but my website hasn't changed
- Refresh the page in your browser.
- Check that the Widget Filter field in Wix contains the ID of the saved widget you edited, and nothing else.
- Make sure you edited the saved widget in the Buying Buddy account that is connected to this Wix website. A saved widget only works on websites authorized in the same account.
I'm a web developer managing a client's Wix site
Saved widgets must exist in your client's Buying Buddy account, not your developer account. See Developer Guide: Managing Filters and Widgets for Wix Sites.