This article explains how to ensure your Buying Buddy WordPress plugin stays up to date, and how to upgrade if you are still running the original version of the plugin.
Which Plugin Version Do You Have?
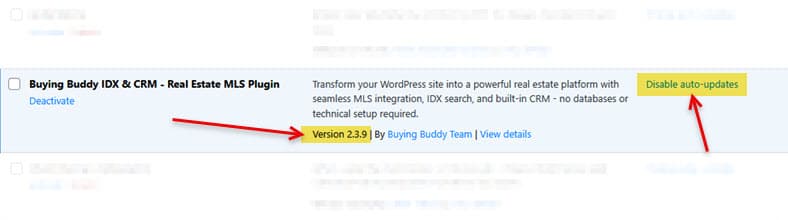
There are two versions of the Buying Buddy WordPress plugin. To check which version you have, go to Plugins in your WordPress admin and look at the version number shown next to "Buying Buddy".
New Plugin — ✅ Version 2.x.x (Current)
Released in 2024 — available from the WordPress Plugin Library
The current plugin was launched in 2024 as a completely new plugin and has a version number starting with 2.x.x. This is the only supported version going forward and is available exclusively through the official WordPress Plugin Library.
If your version starts with 2.x.x, you are on the current plugin. Simply ensure that automatic updates are enabled (see below) and no further action is needed.
Original Plugin — ❌ Version 5.x.x (No Longer Supported)
Legacy plugin — must be replaced
The original plugin has a version number starting with 5.x.x. This version was distributed as a zip file download and is no longer supported — there are no further updates available for it.
Action Required: If your version starts with 5.x.x, you must replace it with the new plugin. Follow the upgrade instructions below.
Keep Automatic Updates Enabled
Always ensure that automatic updates are enabled for the Buying Buddy plugin. This ensures that new features and fixes are deployed automatically to your website.
To check this, go to Plugins in your WordPress admin and look for the "Enable auto-updates" link next to Buying Buddy. If it shows "Disable auto-updates", auto-updates are already on.
Good to know: Updating the plugin will not affect your settings or any widgets that you have added to your website.
Update the Original V5.x.x Plugin to the New Plugin
If you are still using the original plugin (shown as Version 5.x.x), follow these steps to replace it with the new plugin.
1
Search for the New Plugin
Find Buying Buddy in the WordPress Plugin Library
In your WordPress admin, go to Plugins → Add New Plugin.
Use the "Search plugins" field to search for "buying buddy".

2
Install and Activate
Replace the old plugin with the new version
- Click Install Now.
- Click Activate and follow the WordPress prompts to override and update the old version with the new version.
Reassurance: You will not lose your settings or any widgets that you have added to your website. The old plugin will be deactivated automatically and can then be deleted.
3
Clear Your Cache
Important — don't skip this step
Make sure to clear all your website caching systems, including:
- Any WordPress caching plugins (e.g. WP Super Cache, W3 Total Cache, LiteSpeed Cache)
- External CDN services such as Cloudflare
- Any server-level caching provided by your hosting company
4
Verify and Clean Up
Confirm the new version and remove the old plugin
Go to Plugins in your WordPress admin and confirm that the Buying Buddy plugin now shows a version starting with 2.x.x.
The old V5.x.x plugin will have been deactivated. You can safely delete it.
Finally, enable automatic updates for the new plugin to ensure you always receive the latest features and fixes.