This guide will walk you through installing and setting up Buying Buddy on your WordPress website. The process involves just two main steps, plus important compatibility notes to ensure everything works smoothly.
Important Notes Before You Begin
SEO Plugins: We recommend using an SEO plugin on WordPress such as Yoast or AIOSEO.
On just the "property details" foundation page, the Buying Buddy plugin overrides the meta tags that the SEO plugins generate so they use unique meta tags for each property page.
NOTE: Rank Math is not recommended as this has created conflicts.
Use WordPress Shortcodes: Always use Buying Buddy shortcodes (like [mbb_widget data-type="SearchForm"]) in WordPress, not HTML div tags. HTML div tags for Published Widgets will NOT work with the WordPress plugin.
Add Buying Buddy WordPress shortcodes as 'text': Many page builders allow you to add predefined 'blocks' to your page. We recommend always adding Buying Buddy shortcodes to "text" blocks. Do not use "code" or "widget" blocks.
Updated Widget Syntax: The plugin now uses data-type= and data-filter= instead of id= and filter= (though old syntax still works).
Critical Theme and Plugin Compatibility
GoDaddy Managed WordPress: Buying Buddy does not work with GoDaddy's Managed WordPress Hosting due to built-in caching. Use regular cPanel hosting instead.
Optimization Plugins: Never defer loading of Buying Buddy scripts. Exclude https://d2w6u17ngtanmy.cloudfront.net/scripts/my-buying-buddy.5.0.js.gz from JavaScript deferment in plugins like WP Rocket.
Caching Plugins: Configure caching plugins to exclude pages with Buying Buddy widgets, or set maximum cache time to 24 hours to ensure current listing data displays.
Lazy Loading: Disable lazy loading on your Details foundation page and avoid plugins that convert images to background images, as these prevent property images from displaying.
Cookie Management Plugins: Do not use these plugins with Buying Buddy.
Buying Buddy requires third-party cookies for core functions including user tracking, lead management, search functionality, and maintaining user sessions. Cookie management plugins block these essential cookies by default, preventing Buying Buddy from functioning correctly.
DO NOT DEFER, and ALWAYS LOAD IN CORRECT ORDER
*Do not defer loading of the Buying Buddy plugin.
Many optimization plugins will manipulate Buying Buddy JavaScript and make it load at the end of the page.
** This WILL break the plugin.**
The Buying Buddy plugin must load at the top of the page.
Normal installation of the plugin ensures the following load sequence. However, we have seen a lot of tinkering, and so its important to note that the loading sequence should always be:
1. Buying Buddy CSS script
2. Buying Buddy JavaScript.
WordPress MU - Multisite: The Buying Buddy WordPress plugin is fully supported in a WordPress multi-site (MU) environment. In such a case, the plugin would be installed once for your Network. You may then Network Activate, or have activate the Buying Buddy plugin with settings and options for each site as needed.
Installation Steps
1
Install the Buying Buddy Plugin
Available in the WordPress Plugin Directory
Install and Activate:
- Go to your WordPress admin panel
- Navigate to Plugins > Add New
- Search for "Buying Buddy"
- Install and activate the Buying Buddy WordPress plugin


Activate Your Account:
After installing the plugin, you'll be prompted to enter your Buying Buddy Account Activation Key:
- Existing users: Enter your Account Activation Key (see below for where to find it).
- New users: Select "Free Trial" or "Buy Now" and follow the on-screen instructions to create your account.
Finding Your Activation Key
You can locate your activation key in several places:
- Welcome email: If you just created an account, check the welcome email we sent you—your activation key is included there.
- Widgets page: Your activation key is displayed at the bottom of the dropdown menu in your Buying Buddy dashboard.
- Authorized Websites page: Navigate to to find your key at the top of the page.
Automatic Setup: When activated, the plugin automatically creates 4 pages: 3 foundation pages with appropriate widgets and 1 search page so you can start testing immediately. Your Buying Buddy account settings are also updated with the correct page URLs.
> Foundation Pages
/listing-results - Search Results page and widget
/listing-details - Property Details page and widget
/listing-market - Market Report page and widget
/communities - The Communities Hub page and widget for the Community Page Builder
> Search Page
/listing-search - Search page example with widget
Add Template Pages (Optional):
The plugin offers template pages that provide examples of how to use various Buying Buddy widgets. These can be modified or deleted as needed.
> Important Template Pages
/team - Team Hub page configured with the My Profile / Office Roster widget
> Other Template Pages
/featured-listings - Example of the Grid Layout showing featured listing
/map-search-page - Example of the map display widget
/home-value-page - Example of the Lead Capture form offering home valuation
/contact-me - Example of the Lead Capture form to "contact me"
/calculator - Example of the Mortgage Calculator widget
Plugin Settings:
Configure your plugin settings with:
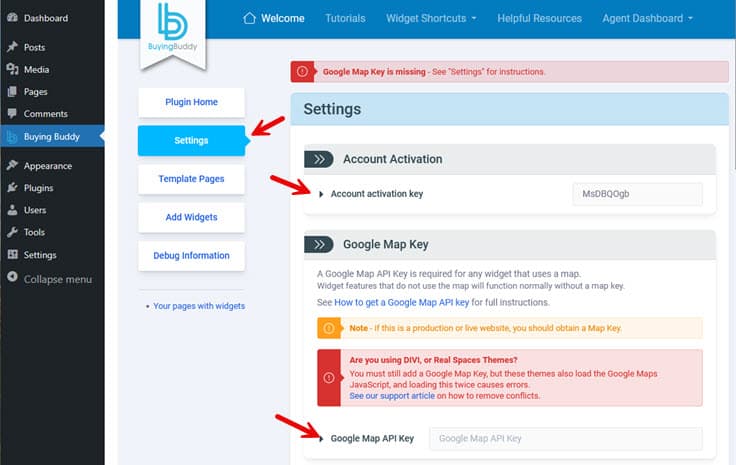
- Activation Key: Required field
- Google Map API Key: (Depreciated - no longer used)
- Agent/Office Index Widget: Enable if you want agent pages at "/team" slug
2
Add the Disclaimer Widget
Keep page designs clean
Add the Disclaimer Widget to your footer to keep your pages clean. This displays required MLS disclaimers in your footer instead of under each widget.
Add this shortcode to your footer:
[mbb_widget data-type="MBBv3_Disclaimer"]
You can customize colors using the Widget Wizard to blend with your footer design. See Disclaimer Widget Reference for more details.
Installation is Complete!
Your plugin is now installed and operational. You can start using Buying Buddy widgets on any number of pages to display properties.
Manual Foundation Pages Setup
The plugin automatically creates foundation pages, but if you need to create them manually:
1
Create Required Pages
Set up foundation pages for results and details
Create two blank pages (don't add to navigation):
- Results Page: Slug "/listing-results"
- Property Details Page: Slug "/listing-details"
2
Add Widgets to Foundation Pages
Add the correct shortcodes to each page
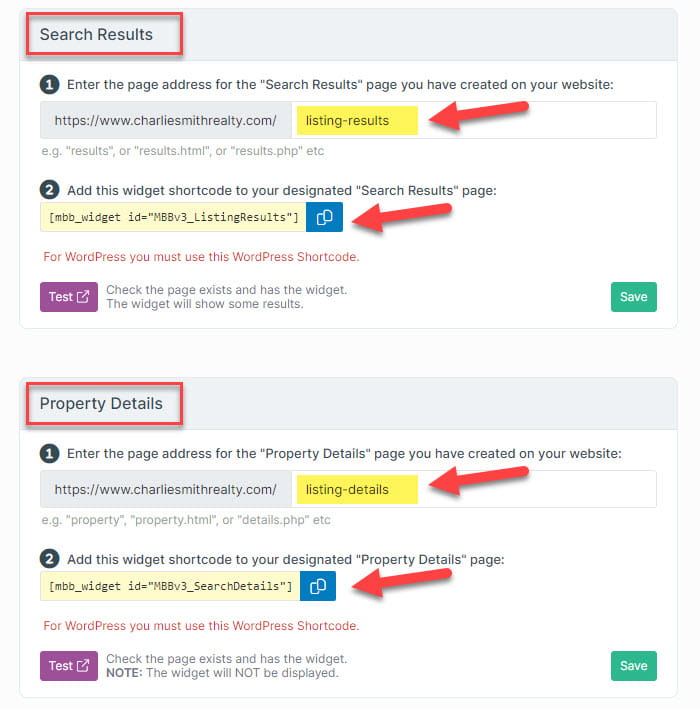
Results page - add this shortcode:
[mbb_widget data-type="MBBv3_ListingResults"]

Details page - add this shortcode:
[mbb_widget data-type="MBBv3_SearchDetails"]
Search form (add to any other page for testing):
[mbb_widget data-type="MBBv3_SearchForm"]
3
Update Foundation Page Settings
Configure your Buying Buddy account
Ensure your Buying Buddy account knows your page addresses:
- Go to in your Buying Buddy dashboard
- Select your domain and click the "Foundation Pages" tab
- Verify page addresses match your WordPress page slugs
- Update if needed to match your actual page names
Troubleshooting
Domain Authorization Issues
If you see "Sorry this domain is not authorized":
- For live sites: Ensure your actual domain is applied and view the live site
- For staging: Contact Help Desk to add your staging domain as a free authorized domain
SQL Error on Details Page
If you see "SQL Error" on the Details page during preview, ignore it. The widget is installed correctly - this error only appears when viewing the widget without a property reference.
Widget Layout Issues
For jumbled or disorganized widget layouts, see Troubleshooting WordPress Plugin Issues.
Enable Automatic Updates
The plugin is regularly updated with new features. Enable automatic updates in your WordPress admin:

Next Steps
Your WordPress site is now ready for advanced Buying Buddy features! Consider adding:
- Featured Listings pages for your properties
- Sold properties displays
- Neighborhood-specific property pages
- Lead capture forms connected to Buying Buddy CRM
- Contact forms
- Custom styling with Widget Themes
For inspiration, view our demonstration sites:
- https://charliesmithrealty.com (WordPress)
- https://charliesmithrealty.net (HTML/PHP)
Additional Resources
- WordPress Compatibility and Technical Notes
- Troubleshooting WordPress Plugin Issues
- How to Display Properties on Web Pages and Blog Articles
- How to Setup IDX Widgets to be Super Search Engine Friendly
Need additional help? Contact our support team through your Buying Buddy dashboard.