This guide walks you through the complete process of adding new client accounts and transitioning them to live status. The workflow is organized into two main phases: creating the account with plugin installation, and upgrading to live MLS data.
A. Adding a New Account
All new client accounts start as Draft accounts, which provide full functionality with demonstration MLS data. The account creation and plugin installation process varies by platform—expand the section below that matches your client's website.
Before You Begin: Use MLS Research in your Developer Portal to confirm IDX data feed availability and requirements for your client's MLS.
Adding Account using WordPress
Step 1: Create the Account
- Navigate to your Developer Portal
- Select "Add Account"
- Complete the required information: client business name, agent/broker contact information, and website domain (staging or production)
- Submit to create the draft account
Step 2: Get the Authorization Key
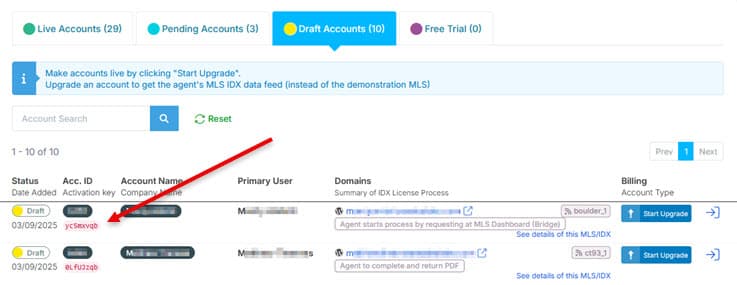
- View the new account from your Developer Portal dashboard in the "Draft Accounts" tab
- Copy the Account Authorization Key from the account summary
Step 3: Install and Configure the Plugin
- In WordPress admin, navigate to Plugins → Add New
- Search for "Buying Buddy"
- Click "Install Now" and then "Activate"
- Accept the terms in the welcome panel
- Enter the Account Authorization Key in the Account Activation panel
- Save settings to complete the connection
For detailed WordPress configuration options, see Installing the MBB WordPress Plugin.
Adding Account using Wix
Do not register domains with Wix. Wix does not allow DNS modifications needed to support Social Sharing. Register domains with a registrar such as GoDaddy instead. If a domain is already registered at Wix, it will need to be transferred to use Social Sharing features.
Step 1: Create the Account with Exact Domain Match
The domain in your Buying Buddy account must match the current Wix website URL exactly.
- Check the exact URL of the Wix website (including www or subdomain, or with folder).
- In your Developer Portal, select "Add Account"
- Enter the domain name exactly as it appears on the published Wix website (exclude "https://" or "http://")
- Example domain matching:
- If Wix site URL is: https://www.abcrealty.com
→ Enter:www.abcrealty.com - If Wix site URL is: https://abcrealty.wixsite.com/website
→ Enter:abcrealty.wixsite.com/website
- Complete other required account information
- Submit to create the account
Step 2: Get the Authorization Key
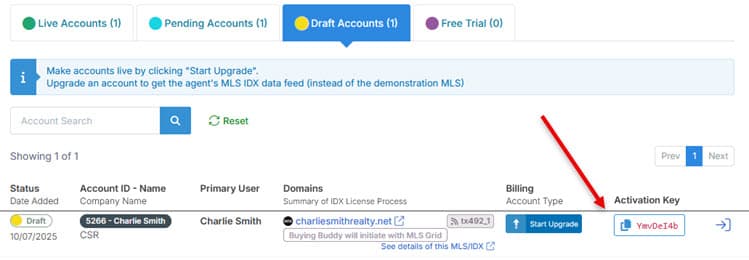
- View the new account from your Developer Portal dashboard in the "Draft Accounts" tab
- Copy the Account Authorization Key from the account summary to your clipboard
Step 3: Add the Wix App
- Access your Wix Editor
- In the Wix Editor, search for "Buying Buddy" in the App Market
- Add the official Buying Buddy App
- Accept the Wix terms and conditions
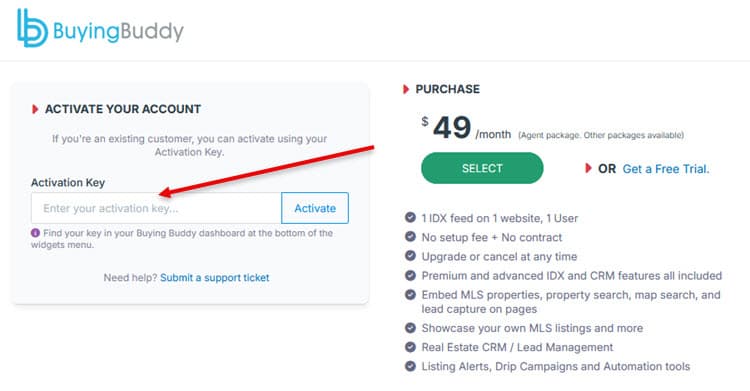
- On the Activate Buying Buddy page, scroll down and enter the client's Account Authorization Key (not yours)
- Save settings to add the App
Adding Account using Other Websites
This section covers all JavaScript plugin implementations including Squarespace, Weebly, Showit, Duda, custom HTML sites, and SDK for PHP implementations.
Step 1: Create the Account
- Navigate to your Developer Portal
- Select "Add Account"
- Complete the required information: client business name, agent/broker contact information, and website domain
- Submit to create the draft account
For hosted platforms (Squarespace, Weebly, etc.), each client site needs its own unique platform domain registered in Buying Buddy.
Step 2: Access the Plugin Code
- Log in to the client's Buying Buddy account from your Developer Portal
- Navigate to
- Go to the "Add Plugin" tab
- Copy the complete JavaScript plugin code block
Important: Always use the client's specific plugin code from their account—never use your developer account's plugin script.
Step 3: Implement the Plugin Code
Add the plugin code to the website following the specific instructions for your platform. Complete the remaining setup tabs in the client's Buying Buddy account including Foundation pages, and Social Share Settings.
See installation instructions for all website types for platform-specific implementation details, or SDK for PHP documentation for PHP implementations.
B. Upgrading to Live Accounts
When your client is ready to move forward, upgrading the account initiates the transition to live MLS data. This process is the same regardless of which platform the website uses.
Starting the Upgrade Process
- Navigate to your Developer Portal dashboard
- Select the draft account you want to upgrade
- Click the "Make Account Live" option
- Choose your billing arrangement
Choosing Your Billing Path
The system presents two billing options:
Option 1: Bill My Account (Developer Pays)
Select this option when you will manage the billing relationship with your client. This allows you to maintain control over account billing, bundle Buying Buddy costs into your services, and immediately proceed with activation.
When you select Bill My Account, the activation form appears immediately. You complete the required account details, and the account status changes to "PENDING" while the IDX approval process begins automatically.
Option 2: The Client Will Be Billed (Client Pays)
Choose this option when your client will pay Buying Buddy directly. This removes billing management from your responsibilities and establishes a direct payment relationship.
When you select The Client Will Be Billed, the system generates a secure activation link and provides sample email text to send to your client. Your client uses the link to access their Buying Buddy account, set up payment information, and complete the activation process. The account remains in DRAFT status until the client completes activation.
Required Information for Account Activation
Regardless of billing path, the following information is required:
Agent/Broker Information: Agent/Broker Name (the MLS member receiving IDX access), MLS Agent ID (the agent's identifier in the MLS system), and Account Type (Single User, Multi User, or Office Solution).
IDX Information: MLS Data Feed selection. Some MLSs require additional identifiers such as FlexMLS Login ID or ARMLS ShortId.
Brokerage Information: Managing Broker Full Name and Email Address, Brokerage Firm Name, Brokerage MLS Office ID (if available), and Brokerage Street Address including City, State, and Zip Code.
Website Domain Information: Production Domain (the final domain name for the live website, required for IDX approval) and Staging Domain if different from production.
What Happens After Activation
Once you or your client completes the activation process:
- The account moves from DRAFT to PENDING status
- The MLS IDX approval process starts automatically
- Your client can sign in to set up their profile and preferences
- Widgets continue using demonstration data until MLS approval completes
- Both you and your client receive confirmation messages
Managing the IDX Approval Process
The IDX approval process varies by MLS. Access detailed instructions for each MLS through the MLS Research panel in your Developer Portal, or click the Instructions for this MLS link in the client's account summary.
While processes vary, most follow these general steps: process initiation (either by agent/broker or Buying Buddy, depending on the MLS), documentation completion, MLS review and approval, and feed activation by Buying Buddy.
Handling Required PDF Forms
Some MLSs require signed PDF forms. These must be uploaded through the Messages panel in the account dashboard—do not email forms directly to Buying Buddy support.
Either the agent can upload the signed PDF directly by signing in to their Buying Buddy account, or you can upload on their behalf by signing in to the client's account using your developer access. The developer-managed approach is often easier because you're already familiar with the interface and can verify the upload was successful.
When approval completes, the system automatically transitions to live MLS data with no additional configuration required.
C. Frequently Asked Questions
How do I change an account's domain name?
Submit a support ticket to request domain authorization changes. This applies to all platforms including WordPress, JavaScript sites, Wix, and Squarespace. Both development and production domains can remain authorized if needed.
What about multiple IDX feeds or advanced scenarios?
For clients requiring multiple websites, subdomains, or MLS feeds, complete the initial setup for the primary domain and MLS first. Then submit a help ticket to request additional domain authorizations, MLS feeds, or user accounts. Our support team will configure the additional requirements.
Troubleshooting common issues
If you encounter any issues during implementation, submit a detailed help ticket including the client account name or ID, website platform, domain name(s) involved, and specific error messages or symptoms.
Common issues and solutions:
- Plugin connection problems: Contact support with account details
- Domain authorization issues: Contact support for domain corrections
- Wix automatic connection failure: Delete the App and re-add it. Ensure you are logged in to the correct Buying Buddy account when adding the App
- Search results not showing: Verify the plugin is properly connected by checking the account dashboard