The Buying Buddy Plugin uses Google Maps.
To use Google Maps, a Google Maps API Key is needed (a long unique number that will be used when the Buying Buddy widgets load on any page).
Without this Key, the mapping components in Buying Buddy widgets will not work.
This Google API Key will come from your own Google account.
You must add your Google API Key to your Buying Buddy account for each authorized domain in your account.
1. Get Started with the Google Maps Platform
The very first thing to do is to log in to your Google account (e.g. GMAIL etc).
- When first setting up your Google cloud account, we have found that this is often a lot easier if you use a personal Gmail/Google account, rather than a company GSuite account - especially when it comes to setting up the Billing account options.
Once you are logged in, go to the Google Maps Platform and click the Get Started button.
Be careful and don't rush through the following panels. Don't miss the vital steps in this process!

2. Create a Project
The first thing to do is create a new project that will be just for this API Key.
Click on the project name button in the header (it will initially say something like "My Maps Project") then click "New Project". Type in a name that you will remember for example the name of your website - and click "Create"

2. Set Up Billing
This is required by Google. Remember to follow our instructions to avoid all charges.
For a new account, click "APIs and services" in the left menu - you will be shown steps to set up a billing account.

So add your payment details - we recommend that you choose an individual account - and then click the "Start Free" button.
The next panel shows your new API key, but don't worry about this just yet.

Make sure both options here are checked and then click the blue button to continue.
3. Protect Your Key
On the "Protect Your API Key" panel you should select "HTTP Referrers" and type in your website domain.

It is VERY important to type this exactly as described here.
So, take care and be accurate when typing.
This method will enable the maps key on subdomains and any pages - so do not be tempted to add something different!
For example, if your website domain is https://www.charliesmithrealestate.com
.. then you would enter:
charliesmithrealestate.com/*
i.e. do not enter 'http', or 'www' etc. - JUST the domain name followed by characters FORWARD-SLASH ASTERISK.
To ensure maps are displayed on widgets you must specify this correctly and you must also add an additional version of this domain in the next step.
4. Website Restrictions
Now add the second version of your domain.
Click "Keys and Credentials" in the menu.

Click the name of the API key that was created, to open the "Key Restrictions" page.
The application restriction should be "Websites"- and if you scroll down a bit more you will see the list of Website Restrictions.
Your domain should already be shown here - so, click "Add" to enter the second version.

Type in your domain again exactly the same as before - but in this case preface it with "star dot".
For example, if your website domain is https://www.charliesmithrealestate.com
.. then you would enter:
*.charliesmithrealestate.com/*
i.e. do not enter 'http', or 'www' etc. - JUST the domain name prefaced with the characters ASTERISK DOT, and followed by characters FORWARD-SLASH ASTERISK.
Just before the "Save" button you will see this section that says "API Restrictions" - you must leave this as: "Don't restrict key".
Do you have a temporary domain or staging site domain?
At this time, you should also add additional domains that will also be able to use your Key.
For example, if you have a Squarespace site with a temporary path - or you are developing on a sandbox domain, then just add the two versions of each.
Before you leave this page double check your work to ensure you have both versions of your domain added - if these are incorrect then your maps will not display - then click "Save".
5. Quotas (to avoid fees)
- On the left menu you now need to select Quotas
- At the top of the main panel on the right, select "Maps JavaScript API"
- Now you will see a heading of "Map Loads"
Click the small "down arrow" on the right to show the full panel

Look down the "Map Loads" panel to the bottom where you will see a small table which lists the quotas.
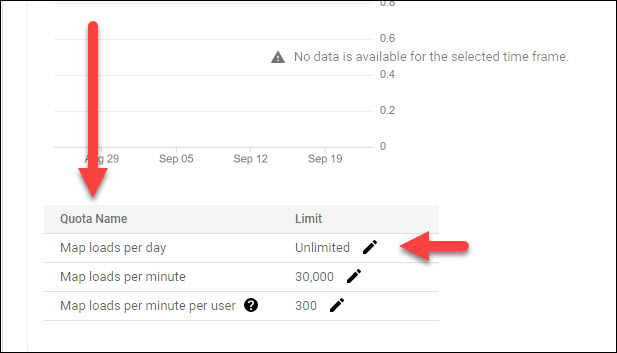
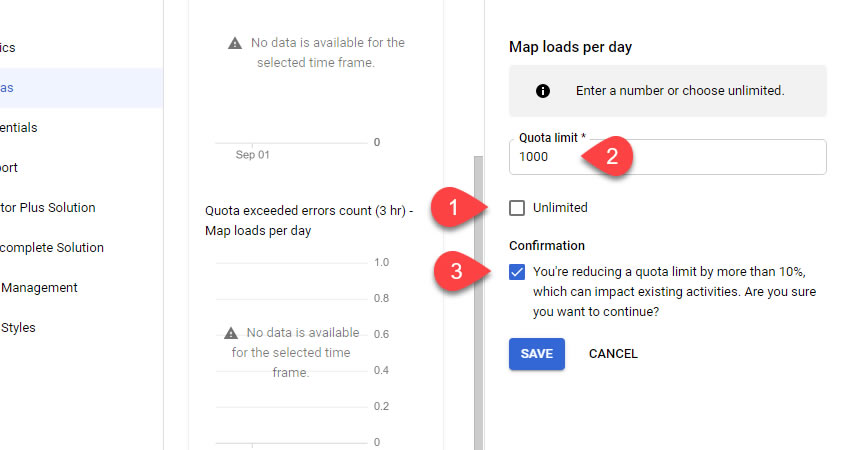
Click the pencil icon for "Map Loads per day" to see the "Edit Quota" panel on the right.
- Uncheck the "Unlimited" option
- Type 1000 as the new Quota
- Check the 'Confirmation' option and SAVE
Next, repeat this for the second quota of "Map Loads Per Minute" - set this to be 1000 too - check the "Confirmation" check-box and click "Save".
Now you have completed setting Quotas!
6. Activate Your Full Account
The last step in the Google Maps Platform is to ensure that you have Activated (upgraded) your account. if you do not do this then your account will stop working in 30 days and you'll need to come back to the Google API system and Activate at that time.
Remember, Google provides $200 of Free Use per month - which equates to 28,000 uses of the Map API, which means it's unlikely you will be charged unless you have very high traffic on your website.
The option to "Activate" is shown in the Billing Overview area - this can be accessed by clicking the hamburger menu on the very left of the header - and then go to Billing.

In the Billing section click the left menu item for "Overview".
If you scroll down you will see your Free Trial status and the Activate button - click Activate to fully activate your account.

7. Add to Buying Buddy
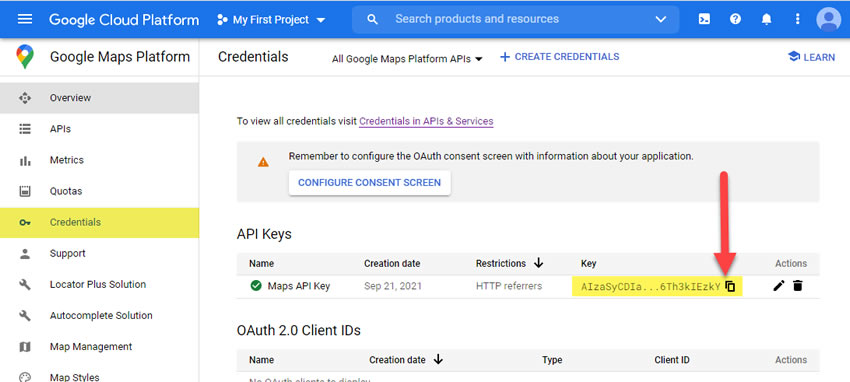
Go to your Google Map Platform Credentials page and then select Credentials from the menu
Your API Key is shown in the API Keys table and you can use the icon on the right to copy your API Key.
For WordPress plugin
If you are using the Buying Buddy WordPress plugin:
- Login to your website's WordPress admin and go to the 'Settings" for the the Buying Buddy plugin.
- Add the Google API Key here, and click "Update Settings".
NOTE: There is no need to add the API Key to the Website Settings in your Buying Buddy dashboard as this will be updated automatically.
For All other types of Website using the JavaScript Plugin
- Login to your Buying Buddy dashboard and go to Plugin Installation and Setup
- Select Google Map Key section
- Add your Google API key to the settings for your domain.
We also recommend that you make a note here too, of the Google Account you used to obtain this key. See these instructions.
Useful direct links for Google Maps Platform
- Direct Link to the Google Maps Platform -mapsplatform.google,com
- Link to set budgets - https://console.cloud.google.com/billing/budgets
(only important if you have very high use and need to manage costs)