Use Buying Buddy Widgets to present any properties from the MLS feed, on any web page or blog post.
For example!
- Are you in a coastal area? Ski-slope properties? Or on a beach, or with ocean views?
Nearly all the MLS search criteria are available to you, so take advantage of this and create really specific, niche pages for each of YOUR markets. - Are you writing a blog post about a neighborhood?
Include a block of live results showing the latest homes for sale in this neighborhood. - Create a web page that shows a block of recently listed homes in a local city, or show all fix-ups between $100K and $200k with more than 3 bedrooms
Two Step Process
- Use the Wizard to create a widget that will display desired properties with a selected layout.
The Wizard will generate the code that you need. - Add the Widget to your website page.
1. Use The Wizard
The Wizard will guide you through the steps to create the display you need.
At the end of the Wizard, you will be able to copy the widget and filter code snippet that can then be added to your your web page.
- The WIDGET you use will determine the layout, e.g. Grid, Carousel, List or Map.
- The FILTER applied to the Widget will determine what listings are shown and some display options for the widget.
If you have multiple websites then select the correct site.
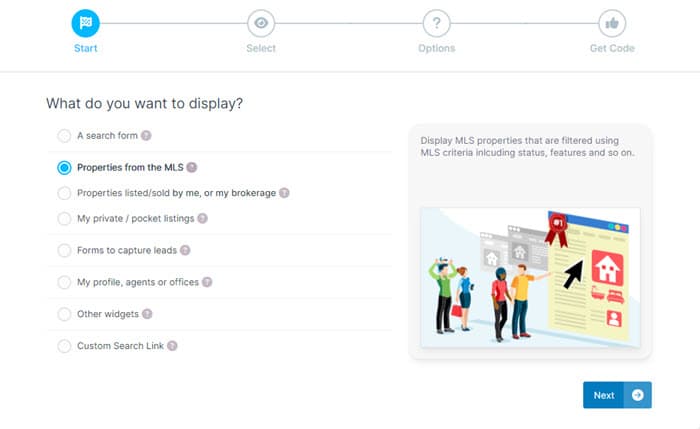
Step-1: Select one of the options to display properties
- Properties from the MLS
- Your own listings in the MLS
- Private listings
Click the NEXT button to continue.
Step-2: Choose the widget layout
- Grid Layout
- Carousel
- List Layout
- Map Display
Click the NEXT button to continue.
Step-3: Select the search criteria to show the properties you want to display:
The next few steps will vary depending on the choices you make.
Use the search form to add in all the search criteria that will be used to filter the properties in this widget. Multiple criteria can be applied.
If you want to add a map shape to the criteria - use the MAP tab on the criteria form. A map shape can used as criteria on any widget - you don't have to use just the Map widget!
Once you think you've got what you want, be sure to click the Preview Listings button and check your results. Use the back button at the top of the preview screen to return to the Wizard.
Click the NEXT button to continue.
Step-4: Extra Filters and Layout Options
The next steps show extra filter and layout options based on your previous choices.
- Extra filters can include your agent ID, office ID
- Layout options allow you to choose options for sort and the number of properties to display
Click the NEXT button to continue.
Step-5: Get Code
At the end of the Wizard you will be shown the widget code to use.
Copy the code shown using the blue copy button/bar.
If you have Wix website then use the option to add the widget to your website.
2. Add to Your Webpage
Now that you have copied the widget code into your clipboard, go to your website page editor and PASTE the code snippet on to the page.
WIX: If you have a Wix site then you will see the widget on your Home Page. select and then 'cut' the widget and move it to the desired location
Save your web page.
When you view the page, you will see the widget create the display of properties.
Advanced Filter Options
The Wizard will generate widget code snippets for nearly every scenario. The filters that are generated are just text and so they can be adjusted as you need when in your web pages to add in more advanced options
See the Filter Parameters and Options reference for all options and a full details on how to use filters.
Always submit a help ticket if you need any assistance (please provide page reference and example) - we will be pleased to help!