The following widget functions perform specific MBB actions for users in your website using your own text or graphics.
They can be deployed as HTML links using a couple of different JavaScript methods in each case.
NOTE FOR WORDPRESS BUILDERS: If you add the following links to a "text" block the editor will strip out "onclick" and other JavaScript event attributes for security reasons. To make this work, add an HTML block. Or use the jQuery methods described below.
Available Widget Functions
Common Functions (no parameters required)
- Show Search Form
- Show "My Account" control panel
- Show "Register Now" panel
- Show the "Login Form"
- Logout
Property Functions
- Show "Request Property Information" panel
- Save this Property
- Save last Search executed by User
- Schedule a Showing
- Send to a Friend
- Show "Mortgage Calculator" panel
User Functions
- Contact User
Use
Widgets Functions can be inserted as clickable links applied to any HTML element that allows an onclick statement.
For example:
a, img, div, button
You should probably adjust your CSS in some of these cases (cursor:pointer;) so that the cursor indicates that it is a clickable link.
A simple method for using a Link Widget is code structured like this:
<a href="#" onclick="FUNCTION_NAME();return false;">do this...</a>
A more advanced and robust method would be to use jQuery with a CSS class, like this:
<a href="#" class="your_class">DO FUNCTION</a>
<script type="text/javascript">
jQuery(".your_class").click(function(e){
    e.preventDefault();
    FUNCTION_NAME();
});
</script>
*NOTE: make sure the script block comes after the link tag that contains "your_class".
Common Functions
Show "Search Form"
The simple method is:
<a href="#" onclick="MBB_SearchForm();return false;">Search for Homes</a>
or, using jQuery with a CSS class:
<a href="#" class="search_form">Search for Homes</a>
<script type="text/javascript">
    jQuery(".search_form").click(function(e){
        e.preventDefault();
        MBB_SearchForm();
    });
</script>
Show "My Account Control Panel"
This is a method to show a popup panel that displays the consumer's MBB My Account panel.
If the consumer is not logged in, then they are shown the "Create New Account / Login" panel - otherwise they see their "My Account" control panel.
Custom Link with onclick
<a href="#" onclick="MBBv3_ControlPanel();return false;">See Your Account Panel</a>
Custom Link without onclick
Use this in instances when only the URL can be specified and there is no option to use an onclick call.
Adding to a WordPress menu
First add a link to the menu item. The link URL should be set as simple #, as shown in the image below.
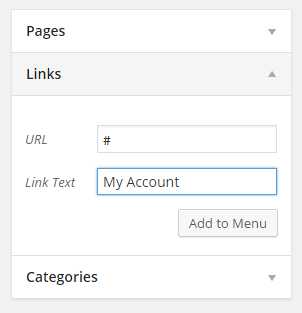
Then look at the source code of the live page to discover the ID, or class of the menu-item, for example you might see it showing as id="menu-item-799", or class="menu-item-799".
The final piece is to be able to add some custom JavaScript to the footer of the page (to load at least after the menu item HTML has loaded).
There is no common way to do this in WordPress - it will depend on your theme and plugins being used.
Your WordPress theme may allow custom JavaScript or code in the page, or you may be using a special plugin to allow this.
Once you have identified how to add your JavaScript, then copy the code below and paste, and make sure you change the menu item ID or Class to be the one you just identified in the source code.
Make sure it loads after the link in the menu has been presented on the page.
For example, if I add a menu item for "My Account" which ends up being identified as: id=menu-item-799, then reference this in the JavaScript call as follows:
<script type="text/javascript">
jQuery("#menu-item-799 a").click(function(){
    MBBv3_ControlPanel();
});
</script>
NOTE: If the identifier is a CSS "class" (not ID), such as class="menu-item-799", then change the reference in the jQuery to preface with a period, not the # symbol like this: jQuery(".menu-item-799 a").
Show the "Register Now" panel
This widget allows you to make a text link, or image "clickable" to show the pop up Registration Form.
To make your image or text clickable use the following simple code (replace the anchor text with an image if required):
<a href="#" onclick="MBBv3_RegisterWidget();return false;">Click here to Register</a>
or, using jQuery with a CSS class:
<a href="#" class="register_now">Click here to Register</a>
<script type="text/javascript">
jQuery(".register_now").click(function(e){
    e.preventDefault();
    MBBv3_RegisterWidget();
});
</script>
If you are using the WordPress Plugin, then the short code is like this:
[mbb_widget_reg link_content="Click here to Register"]
Or, make an image clickable using the WordPress short code like this:
[mbb_widget_reg link_content="Register Now" image_url="http://www.you-image-url-here"]
Show the Login Form
This widget allows you to make a text link, or image "clickable" to show the pop up Login Form for returning leads.
To make your image or text clickable use the following simple code (replace the anchor text with an image if required):
<a href="#" onclick="MBBv3_LoginForm();return false;">Sign In</a>
Executes a "LOGOUT" action
This function will log out the User and reload all widgets:
<a href="#" onclick="MBB_LogoutUser();">Logout</a>
or, using jQuery with a CSS class:
<a href="#" class="logmeout">Logout</a>
<script type="text/javascript">
    jQuery(".logmeout").click(function(e){
        e.preventDefault();
        MBB_LogoutUser();
    });
</script>
Property Functions
Show "Request Information" on a Property panel
The simple method is:
<a href="#" onclick="MBB_RequestInformation('property_id');return false;">Request More Information</a>
or, using jQuery with a CSS class:
<a href="#" class="request_info" propid="12345">Request More Information</a>

<script type="text/javascript">
    jQuery(".request_info").click(function(e){
    e.preventDefault();
    var property_id = jQuery(this).attr("propid");
    MBB_RequestInformation(property_id);
    });
</script>
The property_id is NOT the MLS# - (see explanation above).
"Save This Listing"
The simple method is:
<a href="#" onclick="MBB_SaveListing('property_id');return false;">Save Property</a>
or, using jQuery with a CSS class:
<a href="#" class="save_listing" propid="12345">Save Property</a>

<script type="text/javascript">
    jQuery(".save_listing").click(function(e){
    e.preventDefault();
    var property_id = jQuery(this).attr("propid");
    MBB_SaveListing(property_id);
    });
</script>
The property_id is NOT the MLS# - (see explanation above).
"Save Last Search" Executed by User
The simple method is:
<a href="#" onclick="MBB_SaveSearch();return false;">Save Search</a>
or, using jQuery with a CSS class:
<a href="#" class="save_search">Save Search</a>
<script type="text/javascript">
    jQuery(".save_search").click(function(e){
    e.preventDefault();
    MBB_SaveSearch();
    });
</script>
"Schedule a Showing"
The simple method is:
<a href="#" onclick="MBB_ScheduleShowing('property_id');return false;">Schedule a Showing</a>
or, using jQuery with a CSS class:
<a href="#" class="sched_showing" propid="12345">Schedule a Showing</a>
<script type="text/javascript">
    jQuery(".sched_showing").click(function(e) {
        e.preventDefault();
        var property_id = jQuery(this).attr("propid");
        MBB_ScheduleShowing(property_id);
    });
</script>
The property_id is NOT the MLS# - (see explanation above).
"Send to Friend"
The simple method is:
<a href="#" onclick="MBB_EmailFriend('property_id');return false;">Send to a Friend</a>
or, using jQuery with a CSS class:
<a href="#" class="send_friend" propid="12345">Send to a Friend</a>
<script type="text/javascript">
    jQuery(".send_friend").click(function(e) {
        e.preventDefault();
        var property_id = jQuery(this).attr("propid");
        MBB_EmailFriend(property_id);
    });
</script>
The property_id is NOT the MLS# - (see explanation above).
Show "Mortgage Calculator" panel
The simple method is:
<a href="#" onclick="MBB_MortgageCalc(PRICE);return false;">Calculate Payments</a>
// or, using jQuery with a CSS class:

<a href="#" class="mortgage_calc">Calculate Payments</a>
<script type="text/javascript">
jQuery(".mortgage_calc").click(function(e){
    e.preventDefault();
    MBB_MortgageCalc(PRICE);
});
</script>
NOTE: PRICE is optional.
If you wish to pass the PRICE as a variable, for example where you want to show multiple loan options, then this example shows how this can be done:
<a href="#" class="mortgage_calc" property-price="450000">Calculate Payments</a>
<script type="text/javascript">
jQuery(".mortgage_calc").click(function(e){
    e.preventDefault();
    var price = jQuery(this).attr("property-price");
    MBB_MortgageCalc(price);
});
</script>
User Functions
Displays the Contact Form Overlay to contact a User
This method will display the Contact form as an overlay and is connected to the current User.
I.e. if the Lead is logged in, then there is a designated User, or if you have set the user referral ID then this is used.
This method can be useful when you are using User Display Variables.
<href="#" onclick="MBB_ContactUser();return false;" class="mbb-UID">Contact</a>