This guide explains how to use the Native Buying Buddy Zapier App as a trigger to automatically send your new leads to other applications. When a new lead is added to Buying Buddy, this trigger starts your automation workflow.
This Guide Covers: The Native Buying Buddy Zapier App trigger functionality
Other Options: For real-time triggers, see our Webhook Triggers Guide | For custom triggers, see our API Integration Guide.
When to Use This Trigger
The Buying Buddy Zapier App trigger is ideal when you want to:
- Export leads automatically to email marketing platforms, CRMs, or spreadsheets
- Create notifications in Slack, email, or SMS when new leads arrive
- Generate tasks in project management tools for lead follow-up
- Sync lead data with other systems in your tech stack
How It Works
Trigger Behavior
- Zapier checks for new leads every 1-15 minutes (based on your plan)
- Each new lead triggers the Zap once
- Leads are processed in the order they were created
- Previously processed leads won't trigger again
Lead Scope by Account Type
- Single User: All your leads trigger the Zap
- Team Member: Only leads assigned to you
- Admin User: ALL leads in the account
- Custom Permissions: Based on your role settings
Available Lead Data Fields
The trigger provides access to these standard lead fields:
Contact Information:
- Email Address
- First Name
- Last Name
- Phone Number
- Mobile Phone
- Work Phone
Property Preferences:
- Property Type Interest
- Price Range
- Location Preferences
- Bedrooms/Bathrooms
- Square Footage
Lead Metadata:
- Lead Source
- Date Created
- Lead Status
- Assigned Agent
Need Custom Fields? If you need access to custom fields or additional data, consider using Webhooks which provide complete lead data including all custom fields.
Step-by-Step Setup Guide
Prerequisites
Before starting, ensure you have:
- Active Buying Buddy account with at least one lead (for testing)
- Zapier account (free or paid)
- Get your API Key:
- Destination app account (e.g., MailChimp, Google Sheets, etc.)
Step 1: Create Your Zap
- Log into your Zapier account
- Click "Create Zap" in the top navigation or go to Dashboard > Create
- You'll see the Zap editor with Trigger and Action sections
Step 2: Configure the Trigger
- Click on "1. Trigger"
- Search for "Buying Buddy" in the app search
- Select the Buying Buddy app (not "Webhooks by Zapier")
- Choose "New Lead" as the trigger event
- Click "Continue"
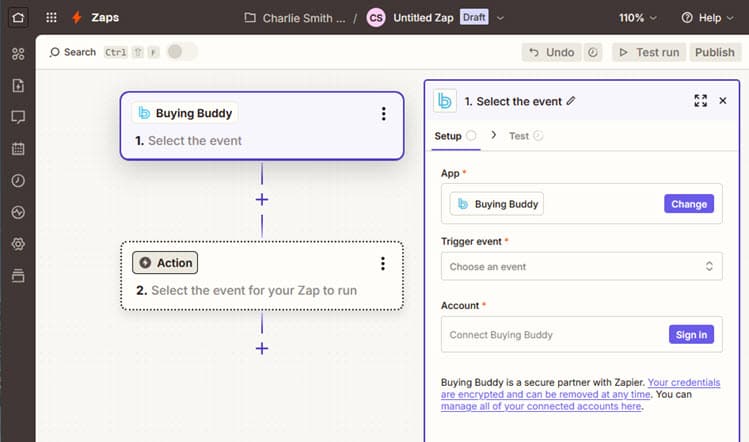
Step 3: Connect Your Buying Buddy Account
First-Time Connection
If you haven't connected Buying Buddy to Zapier before:
- Click "Sign In" when prompted
- A popup window will appear
- Paste your Lead Import API Key
- Click "Continue" to authorize
Using an Existing Connection
If you've previously connected Buying Buddy:
- Select your account from the dropdown
- Click "Continue"
Pro Tip: Your connection is saved in My Apps > App Connections for reuse across multiple Zaps.
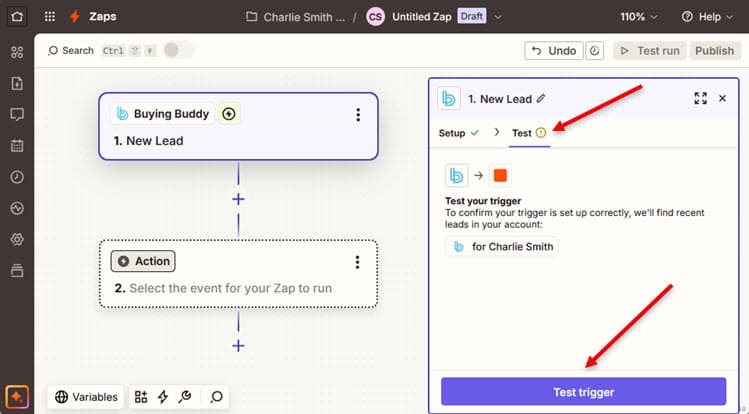
Step 4: Test the Trigger
- Click the "Test" tab
- Click "Test Trigger"
- Zapier will fetch recent leads from your account
- Review the sample data to verify fields are populated correctly
- Select a lead to use as test data
- Click "Continue with selected record"
No Test Data? If the test doesn't return any leads, verify that: (1) You have leads in your account, (2) Your API key is correct, (3) You have permission to access those leads based on your account role.
Step 5: Set Up Your Action
Now configure where to send your Buying Buddy leads:
- Click on "2. Action"
- Search and select your destination app
- Choose the specific action (e.g., "Add Subscriber", "Create Row")
- Connect your destination app account if needed
- Map Buying Buddy fields to destination fields
Step 6: Test and Activate
- Click "Test" in the Action section
- Review the data that will be sent
- Click "Test & Continue"
- Verify the test data arrived in your destination app
- Name your Zap descriptively
- Click "Publish" to activate
Popular Action Combinations
Email Marketing Integration
| Destination | Common Use Case | Key Field Mappings |
|---|---|---|
| MailChimp | Add to nurture campaigns | Email → Email Address Tags → Property Interest |
| ActiveCampaign | Trigger automation sequences | Custom Fields → Lead Score Lists → Lead Source |
| Constant Contact | Newsletter subscriptions | Lists → "New Leads" Source → "Website" |
CRM Synchronization
| Destination | Common Use Case | Key Field Mappings |
|---|---|---|
| HubSpot | Create deals/contacts | Deal Stage → "New Lead" Owner → Assigned Agent |
| Salesforce | Lead object creation | Lead Source → Source Rating → Lead Score |
| Pipedrive | Add to sales pipeline | Stage → "Qualified" Value → Price Range |
Team Notifications
| Destination | Common Use Case | Key Field Mappings |
|---|---|---|
| Slack | Channel notifications | Message → Lead details Channel → #new-leads |
| Gmail | Email alerts to team | To → team@company.com Subject → New Lead: [Name] |
| SMS/Twilio | Urgent lead alerts | Message → High-value lead To → Agent phone |
Advanced Configuration Options
Using Filters
Add filters between your trigger and action to process only specific leads:
- Source Filter: Only process Facebook leads
- Location Filter: Only process leads in specific areas
- Price Range Filter: Only process luxury buyers
Using Paths (Multi-Step Zaps)
Create different workflows based on lead characteristics:
- Path A: Buyers → Add to buyer campaign + Create CRM deal
- Path B: Sellers → Add to seller campaign + Schedule valuation
- Path C: Renters → Add to rental list + Send available properties
Using Formatter Steps
Transform data before sending to destination:
- Format Phone Numbers: Standardize to (XXX) XXX-XXXX
- Split Names: Separate "John Smith" into first/last
- Calculate Values: Convert price range to commission estimate
- Format Dates: Convert timestamps to readable dates
Troubleshooting Guide
Common Issues and Solutions
| Issue | Possible Cause | Solution |
|---|---|---|
| Zap not triggering | Zap is turned off | Check Zap status in dashboard |
| No new leads added | Add a test lead to verify | |
| API key changed | Reconnect Buying Buddy account | |
| Missing lead data | Fields not mapped | Review action field mappings |
| Data not in Buying Buddy | Check lead has all required data | |
| Duplicate leads sent | Multiple Zaps running | Check for duplicate Zaps |
| Manual replay of tasks | Avoid replaying tasks in Zapier | |
| Authentication errors | Invalid API key | Generate new key in Buying Buddy |
| Account suspended | Check account status |
Checking Zap History
To investigate issues:
- Go to Dashboard > Task History in Zapier
- Filter by your Zap name
- Look for error messages or stopped tasks
- Click on individual tasks for details
Best Practices
Do's
- ✓ Test thoroughly before going live
- ✓ Use descriptive Zap names
- ✓ Set up error notifications
- ✓ Document your field mappings
- ✓ Monitor task usage regularly
Don'ts
- ✗ Don't create duplicate Zaps
- ✗ Don't share your API key
- ✗ Don't ignore error messages
- ✗ Don't replay tasks unnecessarily
- ✗ Don't forget to turn Zaps on
Frequently Asked Questions
How quickly will new leads trigger my Zap?
This depends on your Zapier plan: Free/Starter plans check every 15 minutes, Professional every 2 minutes, and Team plans every minute. For instant triggers, consider using Webhooks.
Can I trigger on lead updates, not just new leads?
The Native App only triggers on new leads. For lead update triggers, you'll need to use Webhooks which support multiple event types.
Why am I not seeing custom fields?
The Native App provides standard fields only. For custom field access, use Webhooks or the API integration.
Can I use multiple Buying Buddy triggers?
Yes! You can create multiple Zaps with different filters or actions. You can also combine the Native App with Webhooks for different use cases.