This comprehensive guide will walk you through setting up webhooks to receive real-time notifications from Buying Buddy in your external automation platforms and third-party services. Webhooks allow you to automatically trigger actions in systems outside of Buying Buddy when leads come in, properties are saved, or other events occur.
What are Webhooks? Think of webhooks as your personal assistant that instantly notifies your other business tools the moment something important happens on your website. When a potential buyer fills out a contact form or saves a property, webhooks immediately alert your CRM, send you a text message, or trigger any other automated action you've set up - all without you having to check your email or manually transfer information between systems.
Technical Details: Webhooks are automated HTTP POST requests sent from Buying Buddy to external URLs when specific events happen. They're faster and more reliable than email notifications for triggering automated workflows in your other business systems and can carry detailed data about the event.
Who can use Webhooks? Webhooks are available to Account Admin and Lead Managers only.
How Webhooks Work
When a trigger event occurs in Buying Buddy (like a new lead submission), the system immediately sends a JSON payload containing event details to your configured webhook URL. Your external automation platform receives this data and can then trigger actions in your other business systems, such as:
- Sending instant SMS or email alerts through your preferred messaging service
- Creating contacts in your external CRM system
- Starting marketing campaigns in your email marketing platform
- Updating external spreadsheets or databases
- Posting notifications to team chat platforms like Slack or Microsoft Teams
Setting Up Webhooks in Buying Buddy
Before configuring your external automation platform, you'll need to set up the webhook in your Buying Buddy dashboard:
- Log into your Buying Buddy dashboard
- Navigate to
- Locate the notification trigger you want to automate (such as "New Lead" or "Property Viewed Multiple Times")
- Click the "Configure" button for that trigger
- The webhook configuration panel will open with guided setup instructions
Platform-Specific Detailed Setup Guides

Zapier Complete Setup Guide
Connect Buying Buddy to 5,000+ apps with Zapier's user-friendly automation
Prerequisites
- Active Zapier account (free or paid plan)
- Access to your Buying Buddy dashboard
- Basic understanding of Zapier's trigger and action concept
Step 1: Create a New Zap
- Log into your Zapier account at zapier.com
- From your dashboard, click the "Create Zap" button (usually located in the top navigation or main dashboard area)
- You'll be taken to the Zap editor where you can configure the trigger and actions
- Give your Zap a descriptive name such as "Buying Buddy Lead Alerts" or "New Property Inquiries"
Step 2: Set Up the Webhook Trigger
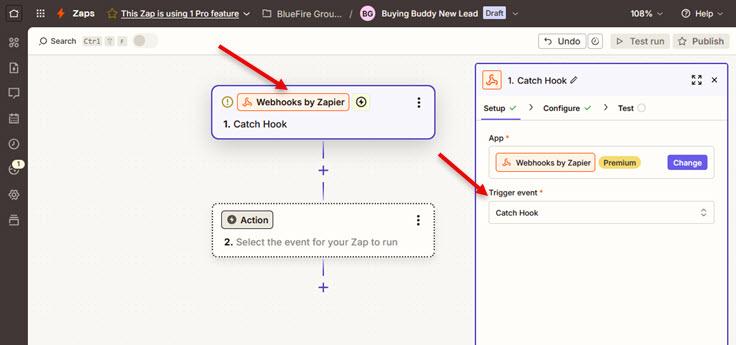
- Click "+Trigger" to choose app
- Search for "Webhooks" in the app selection dropdown
- Select "Webhooks" (by Zapier) from the results
- Choose "Catch Hook" as the trigger event
- Click "Continue" to proceed to the "Test" step.
Skip the "Configure" step (leave the "Pick off a Child Key" field empty for now).
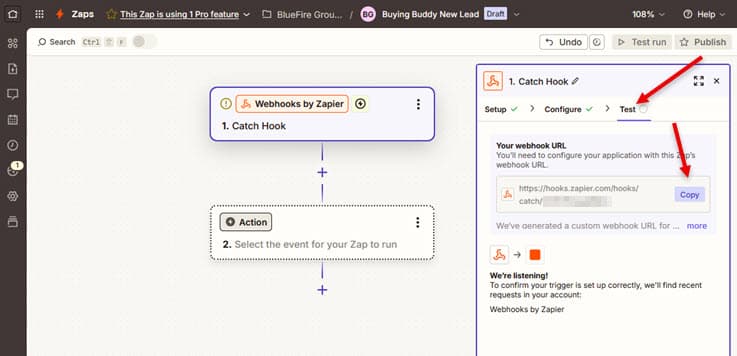
Step 3: Configure the Webhook Settings
- On the "Test" step, Zapier will automatically generate a unique webhook URL for your Zap
- Copy the webhook URL provided by Zapier (it will look like:
https://hooks.zapier.com/hooks/catch/xxxxxxx/xxxxxxx/) - Leave this panel open - don't click Test Trigger just yet
Step 4: Configure the Webhook in Buying Buddy
- Open a new browser tab and log into your Buying Buddy dashboard
- Navigate to
- Locate the notification trigger you want to automate (such as "New Lead" or "Property Viewed Multiple Times")
- Click the "Configure" button for that trigger
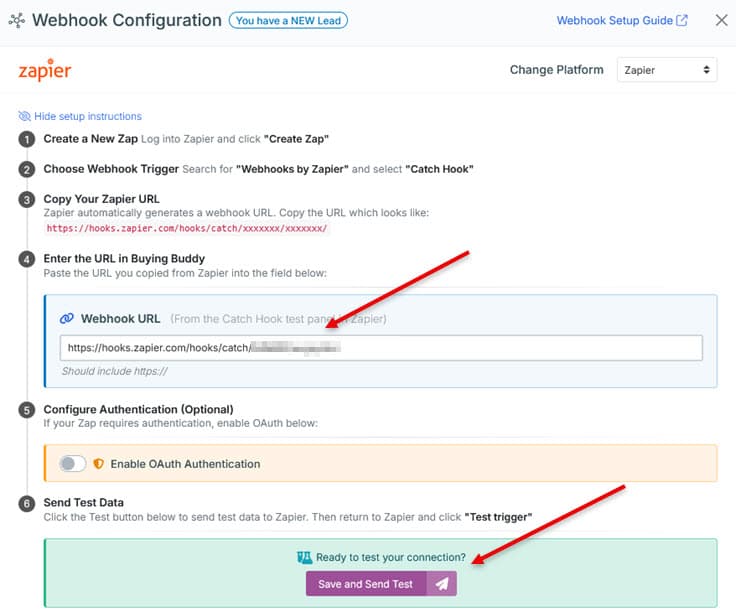
- In the webhook configuration modal:
- Select "Zapier" from the Platform dropdown
- Paste the webhook URL you copied from Zapier into the "Webhook URL" field
- Leave OAuth authentication disabled unless specifically required
Step 5: Test the Connection
- In the Buying Buddy webhook configuration modal, click the "Save and Send Test" button
- You should see a success message indicating the test was sent
- Return to your Zapier tab
- Click "Test Trigger" to verify Zapier received the test data
- If successful, you'll see the sample webhook data from Buying Buddy
- Click "Continue" to proceed to setting up your actions

Step 6: Set Up Your Actions
Now that your webhook trigger is working, you can add actions to your Zap. Popular actions include:
- Email notifications: Use Gmail, Outlook, or SMTP modules to send alerts
- SMS alerts: Connect to Twilio or similar services for instant notifications
- Send Marketing Emails Send marketing campaigns from Mailchimp
- External CRM integration: Create or update contacts in Follow Up Boss, HubSpot etc
- Team notifications: Post to Slack channels or Microsoft Teams
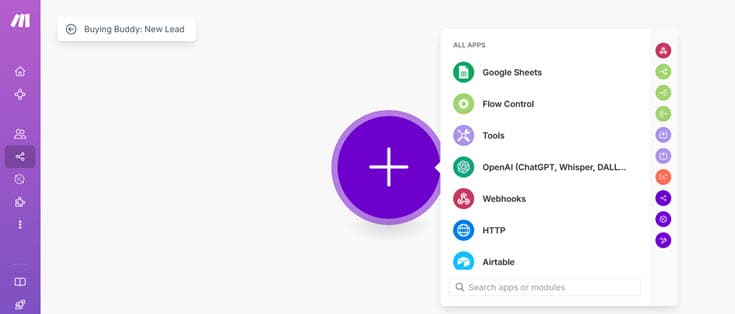
- Tracking: Log information to Google Sheets or Airtable
For field mapping, reference the Complete Webhook Data Reference section for available data fields and structure.
Step 7: Activate Your Zap
- After configuring all desired actions, review your Zap settings
- Click "Publish Zap" or "Turn on Zap" to activate it
- Return to Buying Buddy and save your webhook configuration
- Your automation is now live and will trigger when the selected events occur
Troubleshooting
- Webhook not receiving data: Verify the URL was copied correctly and contains no extra spaces
- Test fails: Ensure your Zap is in "draft" mode and the webhook trigger is properly configured
- Missing data fields: Check the webhook payload structure in the data reference section

Make.com Complete Setup Guide
Advanced automation with visual workflows and powerful data processing
Prerequisites
- Active Make.com account (free or paid plan)
- Understanding of Make.com's visual scenario builder
- Access to your Buying Buddy dashboard
Step 1: Create a New Scenario
- Log into your Make.com account at make.com
- From your dashboard, click "Create a new scenario"
- Give your scenario a descriptive name like "Buying Buddy Lead Processing" or "Property Inquiry Automation"
- You'll see the visual scenario editor with a single starting module placeholder
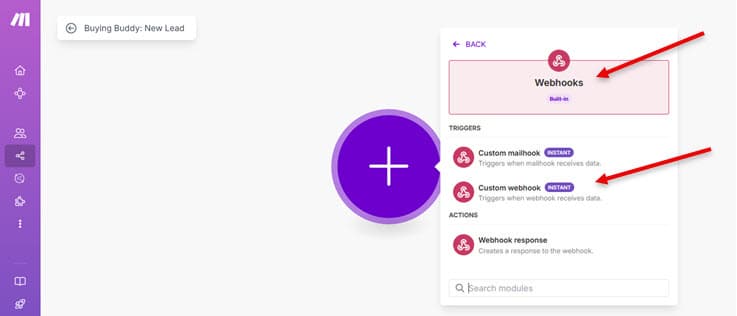
Step 2: Add the Webhook Module
- Click the "+" button in the scenario editor to add a new module
- In the app search field, type "Webhooks"
- Select "Webhooks" from the search results
- Choose "Custom webhook" from the available webhook options
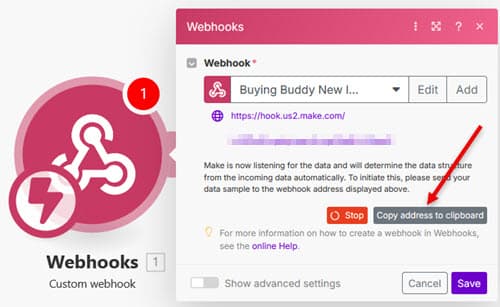
Step 3: Configure the Webhook
- Click "Create Webhook", then in the webhook configuration dialog, provide a name for your webhook (e.g., "Buying Buddy Leads")

- Leave all other settings at their default values
- Click "Save" to create the webhook
- Make.com will generate a unique webhook URL
(looks like:https://hook.us2.make.com/xxxxxxxxx) - Copy this URL - you'll need it for the next step
- Click "Save"
- Click "Run Once" in the bottom options of the scenario editor. You will now see that the scenario is "waiting for data".
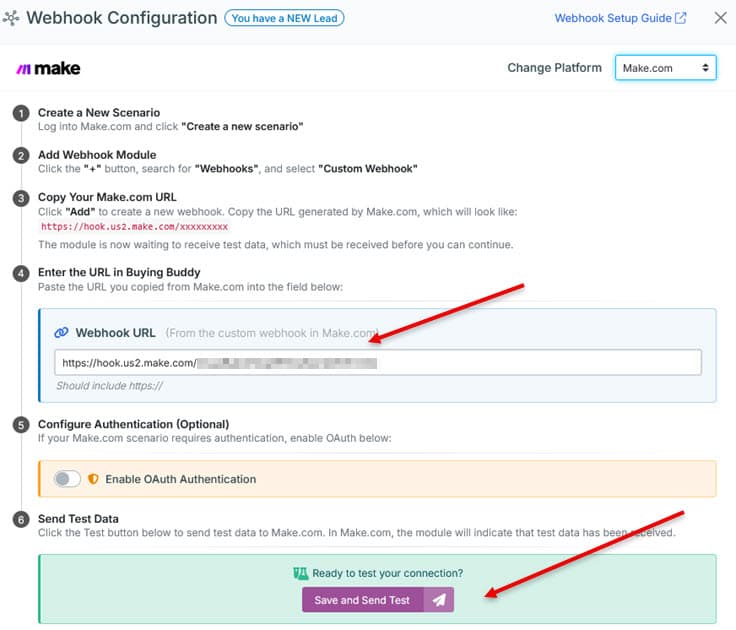
Step 4: Configure the Webhook in Buying Buddy
- Open a new browser tab and log into your Buying Buddy dashboard
- Navigate to
- Find the notification trigger you want to automate (such as "New Lead" or "Property Viewed Multiple Times")
- Click the "Configure" button for that trigger
- In the webhook configuration modal:
- Select "Make.com" from the Platform dropdown
- Paste the webhook URL you copied from Make.com into the "Webhook URL" field
- OAuth authentication is typically not required for Make.com webhooks
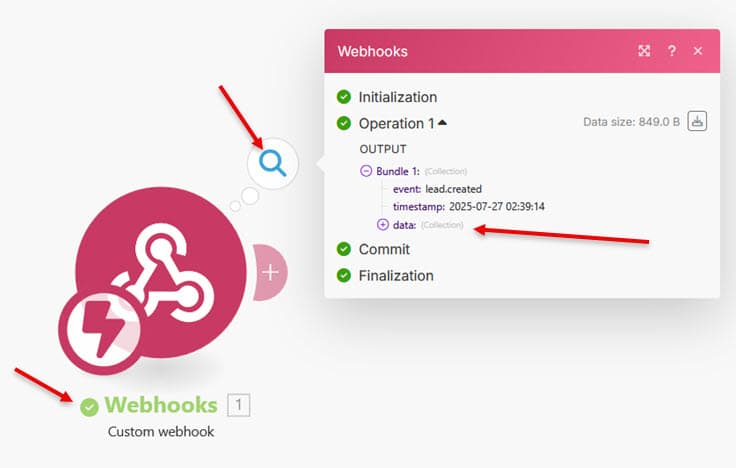
Step 5: Send Test Data
- In the Buying Buddy webhook configuration modal, click the "Save and Send Test" button
- You should see a success message confirming the test was sent
- Return to your Make.com scenario tab
- The webhook module should now show "Successfully determined" with a green checkmark
- Click on the webhook module to view the received test data
Step 6: Build Your Automation
Now that your webhook is receiving data, you can add modules to process the information. Common automation patterns include:
- Email notifications: Use Gmail, Outlook, or SMTP modules to send alerts
- SMS alerts: Connect to Twilio or similar services for instant notifications
- Send Marketing Emails Send marketing campaigns from Mailchimp
- External CRM integration: Create or update contacts in Follow Up Boss, HubSpot etc
- Team notifications: Post to Slack channels or Microsoft Teams
- Tracking: Log information to Google Sheets or Airtable
To add modules:
- Click the "+" button to the right of your webhook module
- Search for and select the service you want to integrate
- Choose the appropriate action (send email, create contact, etc.)
- Map webhook data fields to the module's input fields
For field mapping, reference the Complete Webhook Data Reference section for available data fields and structure.
Step 7: Test and Activate
- Once you've configured all modules, click "Run once" to test your scenario
- Verify that all modules execute successfully
- If everything works correctly, turn on the scenario by clicking the "ON" toggle
- Set your desired execution schedule (immediately, every 15 minutes, etc.)
- Save your webhook configuration in Buying Buddy
Screenshot: Make.com scenario execution and activation controls
Troubleshooting
- Webhook stuck on "Waiting for data": Ensure you've sent test data from Buying Buddy and the URL is correct
- Scenario not triggering: Check that the scenario is turned ON and verify webhook configuration
- Module execution errors: Review module configuration and ensure required fields are mapped correctly

GoHighLevel Complete Setup Guide
Integrate with workflow automations
Prerequisites
- Active GoHighLevel account with workflow permissions
- Understanding of GoHighLevel's automation features
- Access to your Buying Buddy dashboard
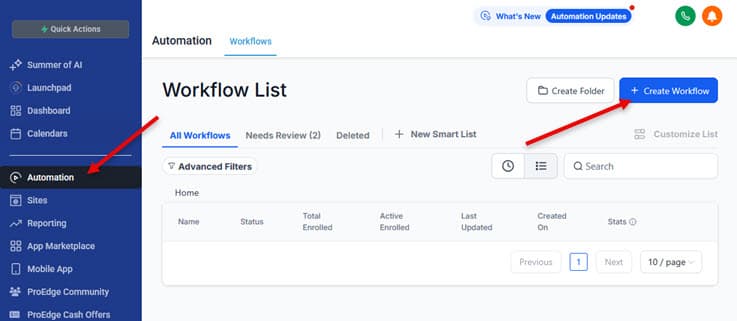
Step 1: Create Your Workflow
- Log into your GoHighLevel account
- From the main navigation, go to Automation > Workflows
- Click "Create Workflow" to start building your automation
- Choose "Start from Scratch" (rather than using a template) to proceed to the workflow builder
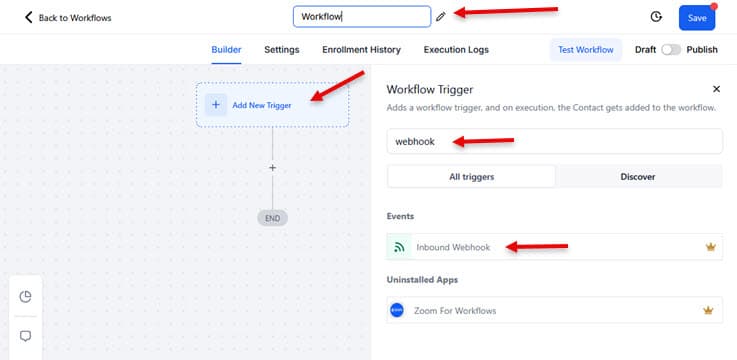
Step 2: Add Webhook Trigger
- In the workflow builder, give your workflow a descriptive name such as "Buying Buddy New Leads" or "Property Inquiry Follow-up"
- You'll see a starting point with "Add New Trigger"
- Click "Add New Trigger"
- From the trigger options, search for then select "Inbound Webhook"
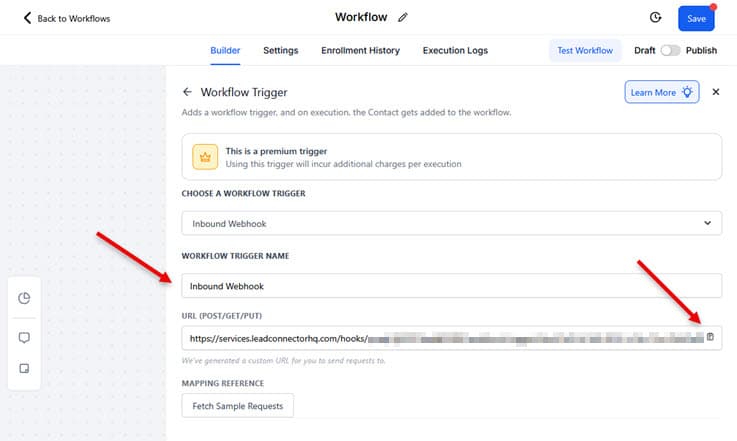
Step 3: Get the Webhook URL
- After selecting "Inbound Webhook", GoHighLevel will automatically generate a unique webhook URL
- Copy the URL provided using the copy icon at the end of field (it will be a long URL specific to your account and workflow)
- Important: Do NOT save the trigger yet - GoHighLevel needs sample data to generate the field mapping before you can save
- Keep the trigger configuration window open - you'll return here after sending test data
Step 4: Configure the Webhook in Buying Buddy
- Open a new browser tab and log into your Buying Buddy dashboard
- Navigate to
- Locate the notification trigger you want to automate (such as "New Lead" or "Property Viewed Multiple Times")
- Click the "Configure" button for that trigger
- In the webhook configuration modal:
- Select "Go High Level" from the Platform dropdown
- Paste the webhook URL you copied from GoHighLevel into the "Webhook URL" field
- OAuth authentication is typically not required for GoHighLevel webhooks
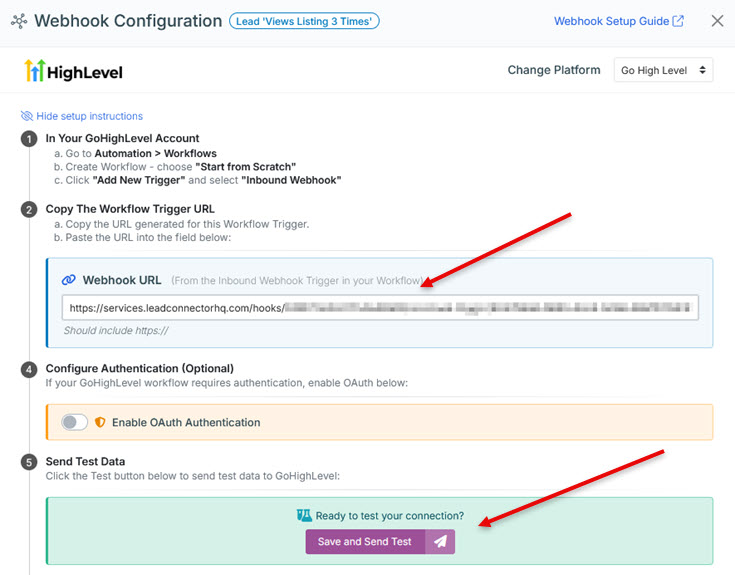
Step 5: Send Test Data and Complete Trigger Setup
- In the Buying Buddy webhook configuration form, click the "Save and Send Test" button
- You should see a success message indicating the test was sent
- Return to your GoHighLevel workflow tab
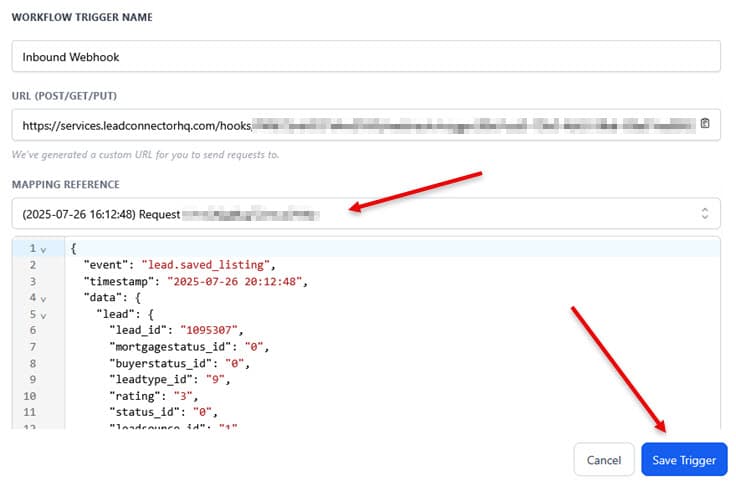
- In the trigger configuration window, under "Mapping Reference" click "Fetch Sample Requests"
- If successful, the button text will change to "Select sample payload".
- Click to view the sample payload - then click the reference to see the details.
You'll see the sample webhook data that was sent from Buying Buddy, and GoHighLevel will generate the field mapping - Now you can click "Save" to complete the trigger configuration
Step 6: Add Workflow Actions
Now that your webhook trigger is configured, you can add actions to your workflow. Popular GoHighLevel actions include:
- Create Contact: Add new leads to your GoHighLevel contacts
- Send SMS: Send instant text message alerts to you or your team
- Send Email: Trigger automated email sequences
- Add to Campaign: Enroll leads in marketing campaigns
- Create Task: Generate follow-up tasks for your team
- Add Tags: Tag contacts based on their property interests
To add actions:
- Click the "+" button below your webhook trigger
- Select the action type you want to add
- Configure the action using data from the webhook payload
- Use the field mapping to pull information like lead name, email, phone, and property details
For field mapping, reference the Complete Webhook Data Reference section for available data fields and structure.
Step 7: Test and Activate
- After configuring all actions, use the "Test" button to run your workflow with the sample data
- Verify that all actions execute correctly
- Once testing is successful, click "Publish" to activate your workflow
- Return to Buying Buddy and save your webhook configuration
- Your automation is now live and will process incoming leads automatically
Troubleshooting
- Sample request fetch fails: Ensure the webhook URL is correct and you've sent test data from Buying Buddy
- Workflow not triggering: Verify the workflow is published and the webhook trigger is properly configured
- Action errors: Check field mappings and ensure required fields are populated from webhook data

Custom Webhook Setup Guide
Connect to any platform that accepts HTTP POST requests
Prerequisites
- A webhook endpoint that can receive HTTP POST requests
- Basic understanding of JSON data format
- Knowledge of your platform's webhook configuration requirements
- Development or technical support resources if building custom integrations
Step 1: Prepare Your Webhook Endpoint
Before configuring the webhook in Buying Buddy, ensure your endpoint is ready:
- HTTP Method: Your endpoint must accept POST requests
- Content Type: Buying Buddy sends
application/jsondata - Response Code: Return HTTP 200 status for successful receipt
- Timeout: Respond within 30 seconds to avoid timeouts
- Security: Use HTTPS endpoints for data protection
Step 2: Understand the Data Structure
Buying Buddy webhooks send comprehensive lead and property data. See the Complete Webhook Data Reference section for available data fields and structure.
- Available data fields and their formats
- Event types that trigger webhooks
- Nested data structures (lead_data, property_data, etc.)
- Optional fields that may be empty or null
Example webhook payload structure:
{
  "event_type": "new_lead",
  "timestamp": "2025-07-24T10:30:00Z",
  "lead_data": {
    "name": "John Smith",
    "email": "john@example.com",
    "phone": "555-123-4567"
  },
  "property_data": {
    "address": "123 Main St",
    "price": "450000",
    "bedrooms": 3
  }
}
Step 3: Configure the Webhook in Buying Buddy
- Log into your Buying Buddy dashboard
- Navigate to
- Locate the notification trigger you want to automate
- Click the "Configure" button for that trigger
- In the webhook configuration modal:
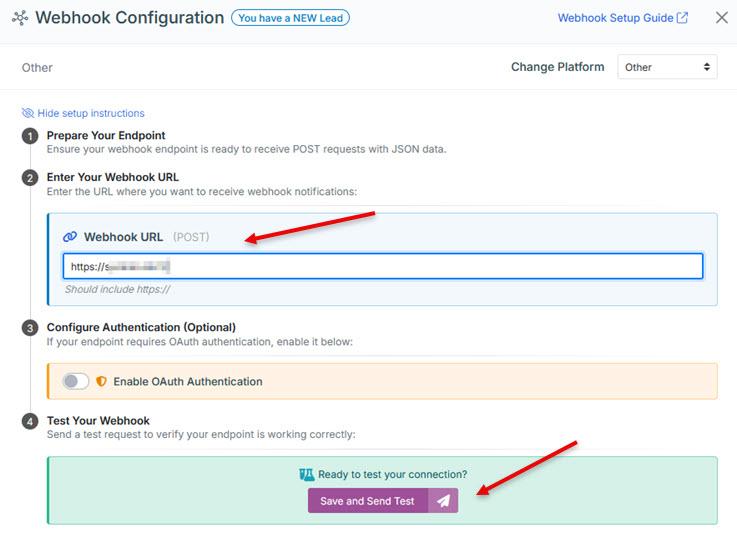
- Select "Other" from the Platform dropdown
- Enter your webhook endpoint URL in the "Webhook URL" field
- Configure OAuth authentication if required (see Step 4)
Step 4: Configure Authentication (If Required)
If your endpoint requires OAuth authentication:
- Enable the "OAuth Authentication" toggle in the webhook configuration
- Enter your OAuth credentials:
- Client ID: Your OAuth application's client identifier
- Client Secret: Your OAuth application's secret key
- Token Endpoint URL: The URL where Buying Buddy can obtain access tokens
- Ensure your OAuth server accepts
client_credentialsgrant type
OAuth Flow: Buying Buddy will automatically obtain and refresh access tokens as needed, including the token in webhook requests as an Authorization header.
Step 5: Test Your Webhook
- In the Buying Buddy webhook configuration modal, click the "Save and Send Test" button
- Monitor your endpoint's logs to confirm data receipt
- Verify that your processing logic handles the data correctly
- Test any downstream actions (emails, database updates, etc.)
- Confirm your endpoint returns HTTP 200 status code
Test Data: The test webhook contains sample lead and property data that matches the structure of real webhook events.
Step 6: Implement Error Handling
Build robust error handling into your webhook endpoint:
- Validate incoming data: Check required fields and data types
- Handle duplicates: Use the timestamp and notification_id to identify duplicate deliveries
- Log errors: Record processing errors for troubleshooting
- Graceful degradation: Continue processing even if some data is missing
- Return appropriate status codes: Use HTTP status codes to indicate success or failure
Step 7: Common Integration Patterns
Popular custom webhook implementations include:
- Email notifications: Use Gmail, Outlook, or SMTP modules to send alerts
- SMS alerts: Connect to Twilio or similar services for instant notifications
- Send Marketing Emails Send marketing campaigns from Mailchimp
- External CRM integration: Create or update contacts in Follow Up Boss, HubSpot etc
- Team notifications: Post to Slack channels or Microsoft Teams
- Tracking: Log information to Google Sheets or Airtable
Step 8: Go Live
- After successful testing, save your webhook configuration in Buying Buddy
- Monitor your endpoint for the first few real webhook deliveries
- Verify that your automation is working as expected
- Set up monitoring and alerting for webhook failures
Troubleshooting
- Test fails: Check endpoint accessibility, HTTPS certificate, and response codes
- OAuth errors: Verify client credentials and token endpoint configuration
- Data processing issues: Review the webhook payload structure and handle optional fields
- Timeout errors: Optimize your endpoint response time and consider asynchronous processing
Security Best Practices
- Use HTTPS: Always use secure endpoints to protect data in transit
- Validate payloads: Verify incoming data matches expected structure
- Rate limiting: Implement appropriate rate limiting on your endpoints
- IP restrictions: Consider restricting access to known Buying Buddy IP addresses
- Data retention: Follow appropriate data retention and privacy policies
See Webhook Data Reference for data structure.
Troubleshooting Common Issues
Webhook Not Firing
Symptoms: No webhook data received despite lead activity
Troubleshooting steps:
- Verify webhook URL is correctly entered in Buying Buddy configuration
- Check that your automation platform is active and listening
- Use the "Send Test" button to verify basic connectivity
- Review your automation platform's webhook logs for incoming requests
- Ensure your endpoint responds with HTTP 200 status code
- Check for firewall or security settings blocking incoming requests
Test Button Not Working
Symptoms: Test webhook fails to send or receive data
Troubleshooting steps:
- Ensure webhook URL includes proper protocol (https:// or http://)
- Verify URL format is correct with no extra spaces or characters
- Check that your automation platform is properly configured to receive webhooks
- If using OAuth, verify all authentication fields are correctly filled
- Test with a simple webhook testing service (like webhook.site) first
Data Mapping Issues
Symptoms: Data appears incorrect or missing in automation actions
Troubleshooting steps:
- Review the webhook data structure above to ensure correct field names
- Check for nested data structures (e.g.,
lead_data.namenot justname) - Verify your automation platform is parsing JSON correctly
- Use the test function to see exactly what data is being sent
- Handle cases where optional fields might be empty or null
Best Practices
Start simple: Begin with one webhook for your most important trigger, then expand once you're comfortable with the process.
Test thoroughly: Always use the "Send Test" button before relying on webhooks for important notifications.
Keep backups: Maintain email notifications as a backup to webhooks in case of automation platform downtime.
Monitor performance: Check your automation platform regularly for failed webhook deliveries.