This guide explains how to use the Native Buying Buddy Zapier App as an action to automatically import leads INTO Buying Buddy from other applications. When events occur in other apps (like Facebook Lead Ads, Gmail, or web forms), this action creates or updates records in your Buying Buddy account.
This Guide Covers: The Native Buying Buddy Zapier App action functionality
Other Options: For advanced actions via API, see our API Guide | For webhook-based workflows, see our Webhook Integration Guide
Available Actions
The Buying Buddy Zapier App provides three powerful actions to manage your leads:
1. Create New Lead
Use When: Importing leads from external sources
- Facebook Lead Ads
- Website forms
- Landing pages
- Event registrations
- Phone system logs
2. Add Note to Lead
Use When: Logging interactions or updates
- Form submissions
- Survey responses
- Support tickets
- Meeting notes
- Status updates
3. Import Email to History
Use When: Capturing email communications
- Gmail messages
- Outlook emails
- Contact forms
- Support emails
- Inquiry responses
Common Use Cases
Lead Generation Sources
| Source | Trigger Event | Buying Buddy Action | Result |
|---|---|---|---|
| Facebook Lead Ads | New lead submitted | Create New Lead | Instant lead capture with auto-response |
| Google Forms | Form submission | Create New Lead | Convert inquiries to leads |
| Typeform | Survey completed | Create New Lead + Add Note | Qualified lead with preferences |
| Calendly | Meeting scheduled | Create New Lead | Appointment-ready lead |
| Website Chat | Chat completed | Create New Lead + Add Note | Lead with conversation history |
Communication Tracking
| Source | Trigger Event | Buying Buddy Action | Result |
|---|---|---|---|
| Gmail | Email from lead | Import Email to History | Complete email trail |
| SMS/Twilio | Text received | Add Note to Lead | Text conversation logged |
| Slack | Message in channel | Add Note to Lead | Team communication tracked |
| Call Tracking | Call completed | Add Note to Lead | Call summary recorded |
Step-by-Step Setup Guide
Prerequisites
Before starting, ensure you have:
- Active Buying Buddy account
- Zapier account (free or paid)
- Get your API Key:
- Source app account (e.g., Facebook, Gmail, etc.)
- Test data in your source app
Step 1: Create Your Zap
- Log into Zapier
- Click "Create Zap" or go to Dashboard > Create
- You'll see the Zap editor
Step 2: Set Up Your Trigger
First, configure what will trigger the lead import:
- Click "1. Trigger"
- Search and select your source app (Facebook, Gmail, etc.)
- Choose the trigger event (New Lead, New Email, etc.)
- Connect your source app account
- Configure trigger settings
- Test the trigger to fetch sample data
Step 3: Add Buying Buddy as Your Action
- Click "2. Action"
- Search for "Buying Buddy"
- Select the Buying Buddy app (not "Webhooks by Zapier")
- Click "Continue"
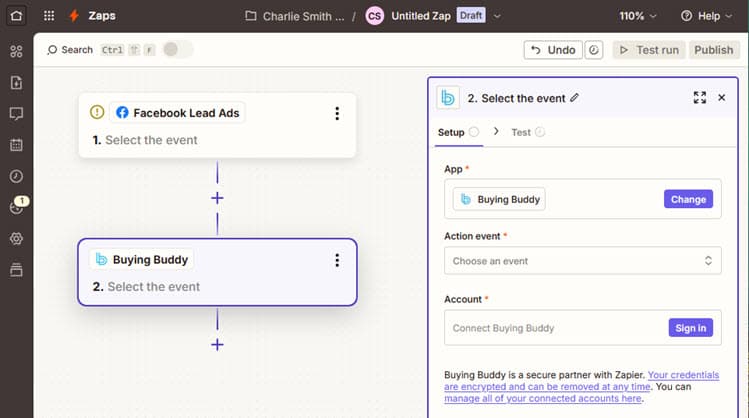
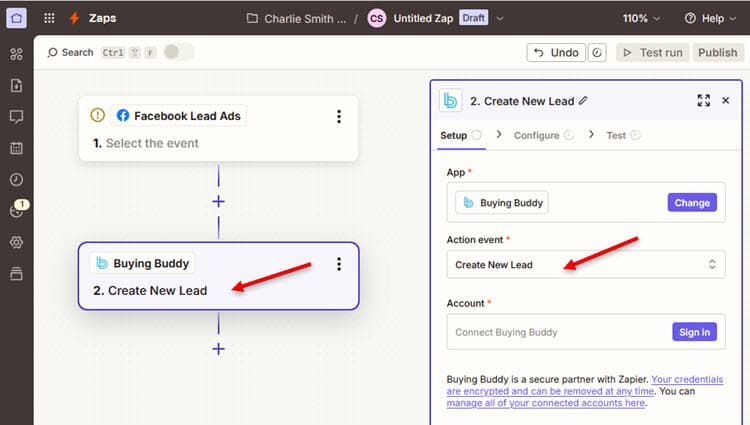
Step 4: Choose Your Action Event
Select the appropriate action based on your needs:
- Choose from:
- Create Lead - For new lead imports
- Add Note - For updating existing leads
- Import Email - For email history
- Click "Continue"
Step 5: Connect Your Buying Buddy Account
One-Time Setup: After connecting once, Zapier saves your credentials in My Apps > App Connections for future use.
If not already connected:
- Click "Sign In" when prompted
- Paste your Lead Import API Key
- Click "Continue" to authorize

Step 6: Configure Field Mappings
Map data from your trigger app to Buying Buddy fields:
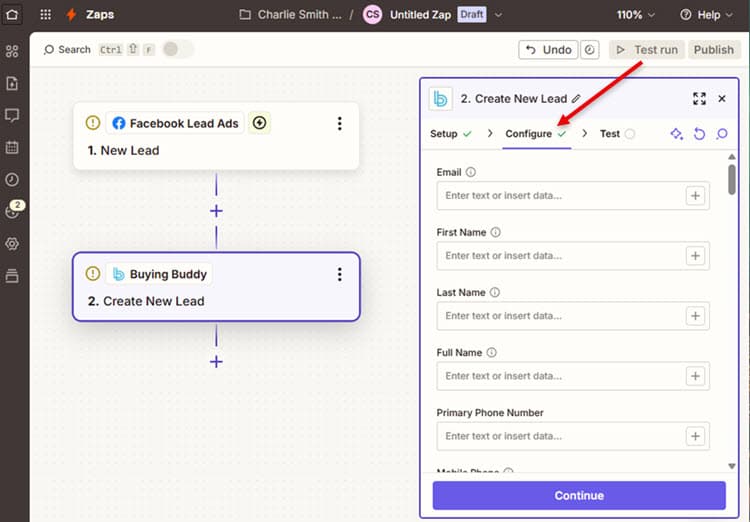
Available Fields for "Create Lead" Action
Contact Information:
- Email (Required)
- First Name
- Last Name
- Phone
- Mobile Phone
- Work Phone
- Address
- City
- State
- Zip Code
Lead Preferences:
- Property Type
- Price Range Min
- Price Range Max
- Bedrooms
- Bathrooms
- Square Feet
- Location Preference
- Timeframe
- Notes
System Settings:
- Lead Source
- Lead Status
- Assigned Agent
- Tags
- Drip Campaign
- Send Welcome Email
- Opt-in Status
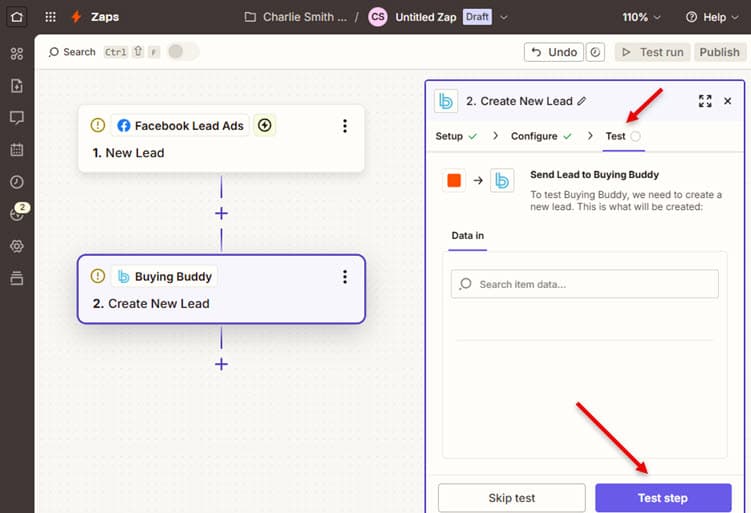
Step 7: Test Your Action
- Click "Test" tab
- Review the test data
- Click "Test & Continue"
- Check Buying Buddy to verify the test worked
Step 8: Activate Your Zap
- Name your Zap descriptively
- Click "Publish"
- Toggle the Zap to "ON"
Advanced Configuration
Duplicate Prevention
Buying Buddy automatically prevents duplicate leads based on email address. When a duplicate is detected:
- The existing lead is updated with new information
- A note is added showing the update source
- The lead's activity timestamp is refreshed
Lead Assignment Rules
Control how leads are assigned to agents:
| Assignment Method | Field Value | Result |
|---|---|---|
| Round Robin | Leave "Assigned Agent" empty | Auto-assigns to next available agent |
| Specific Agent | Enter agent email | Assigns to that agent |
| Lead Source Based | Use conditional logic | Different agents for different sources |
| Territory Based | Use zip code logic | Assigns based on location |
Drip Campaign Integration
Automatically enroll leads in drip campaigns:
- Campaign ID: Enter the specific campaign ID number
- Dynamic Selection: Use conditional logic based on lead type
- Delay Start: Set initial delay before first email
- Custom Tags: Add tags to trigger specific campaigns
Popular Integration Examples
Facebook Lead Ads → Buying Buddy
Trigger: Facebook Lead Ads - New Lead
Action: Buying Buddy - Create Lead

Field Mappings:
- Email → Email
- Full Name → Split into First/Last Name
- Phone Number → Phone
- Property Interest (custom field) → Notes
- Lead Form Name → Lead Source
- "Facebook Ads" → Tags
- "Buyer" → Lead Type
- Campaign ID → Drip Campaign
Gmail → Lead History
Trigger: Gmail - New Email Matching Search
Action: Buying Buddy - Import Email to History

Field Mappings:
- From Email → Lead Email
- Subject → Email Subject
- Body Plain → Email Body
- Date → Email Date
- "Inbound Email" → Source
Typeform Survey → Qualified Lead
Trigger: Typeform - New Entry
Action 1: Buying Buddy - Create Lead
Action 2: Buying Buddy - Add Note

Lead Creation:
- Email → Email
- Name fields → First/Last Name
- Budget Answer → Price Range
- Location Answer → Location Preference
- Timeframe Answer → Timeframe

Note Addition:
- Full survey responses → Note Content
- "Survey Response" → Note Type
Troubleshooting Guide
Common Issues and Solutions
| Issue | Possible Cause | Solution |
|---|---|---|
| Lead not created | Missing required email field | Ensure email is mapped and valid |
| Invalid API key | Regenerate and update API key | |
| Account limits reached | Check account status and limits | |
| Wrong agent assigned | Incorrect email format | Use exact agent email address |
| Agent not in system | Verify agent exists in account | |
| Drip not starting | Invalid campaign ID | Get correct ID from Buying Buddy |
| Lead opted out | Check opt-in status field | |
| Note not appearing | Wrong email for existing lead | Verify email matches exactly |
| Lead doesn't exist | Create lead first, then add note |
Testing Tips
- Use test data: Create test leads with obvious test emails (test@example.com)
- Check field formats: Ensure phone numbers, dates match expected formats
- Monitor task history: Review in Dashboard > Task History
- Verify in Buying Buddy: Always check that data appears correctly
Best Practices
Data Quality
- ✓ Validate email formats
- ✓ Standardize phone numbers
- ✓ Use consistent lead sources
- ✓ Apply appropriate tags
- ✓ Set realistic lead scores
Workflow Design
- ✓ Test thoroughly before activating
- ✓ Document field mappings
- ✓ Set up error notifications
- ✓ Review logs regularly
- ✓ Keep API key secure
Frequently Asked Questions
Can I update existing leads instead of creating new ones?
The Create Lead action automatically updates existing leads if the email matches. For more control over updates, consider using the API via Zapier Code steps.
How do I handle leads without email addresses?
Email is required for lead creation. For phone-only leads, consider using a placeholder email format like phone+1234567890@placeholder.com or using the API for more flexibility.
Can I import historical leads in bulk?
Zapier processes triggers one at a time. For bulk imports, use the Buying Buddy CSV import feature or API batch endpoints.
What happens if my Zap fails?
Zapier will retry failed tasks automatically. Set up error notifications in your Zap settings to be alerted of persistent failures.