
IMAGEPRO websites have been around a long time, but it's easy to add a modern, mobile-responsive IDX solution to your website with Buying Buddy widgets! This guide will walk you through the installation process.
Important: Installing on IMAGEPRO follows the same process as any regular HTML website, with a couple of extra steps specific to IMAGEPRO websites. Because there is no way to add the Buying Buddy plugin JavaScript site-wide, you must load the JavaScript on each page where you want to display Buying Buddy widgets.
Height Adjustment: IMAGEPRO Custom Pages are set at a fixed height which can cut off the longer display of content from Buying Buddy widgets. We'll add custom JavaScript to allow widgets to adjust height and display correctly.
Installation Steps
1
Get the Buying Buddy JavaScript Code
Prepare the plugin code for installation
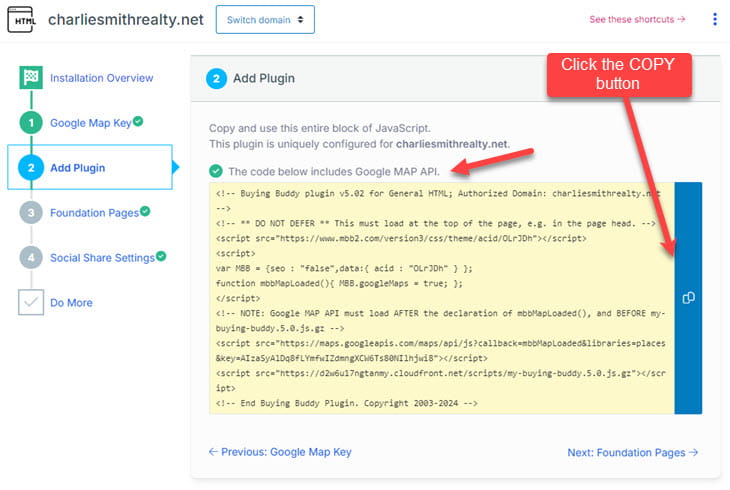
Get Your Plugin Code:
- In your Buying Buddy dashboard go to
- Select your website and ensure it's set as an IMAGEPRO site on the "Get Ready" tab
- Go to the "Add Plugin" tab and copy the JavaScript code
Stay logged in and keep this page open in a browser tab while you now go to your IMAGEPRO admin area.
2
Create Foundation Pages with Widgets
Set up required pages and search functionality
Important: Create pages that are NOT in your menus (they are reserved for use by Buying Buddy). Add the correct widget to each page (only one widget per page), and ensure page addresses are added to your Buying Buddy account settings.
You need to create 2 key pages for your Buying Buddy account:
- Results Page (which will show the "Results" widget)
- Property Details Page (which will show the "Property Details" widget)
Plus, you will also need to add a Search Form widget on any other page for testing.
Create Search Page and Add to Menu:
- Open a new browser tab and login to your IMAGEPRO dashboard
- In IMAGEPRO control panel, click "Menu" at the top and go to "Manage Custom Pages"

- Create your new Custom Page:
- Ensure "Select Page" is set as "New Custom Page"
- Give it a title like "Home Search".
- Click the "Source" button to paste in code
- Paste the Buying Buddy script you copied in step 2
- Add the search form widget code below the script:
<bb-widget data-type="SearchForm"></bb-widget>

- Click "SAVE CHANGES"
Add Search Page to Site Menu:
- In your IMAGEPRO dashboard, click "Menu" then "Edit MENU"
- Drag "Custom Page" from the left list to the right list
- Click the small EDIT button on the new item
- Change the "Label" to "Home Search"
- Click EDIT in the bottom panel, select the page you just created, then click "Done"
- Click OK, then click "Save Changes"

Create Results and Details Pages:
You'll need to add custom JavaScript to these pages so results and property details are fully shown and not cut off. This is the EXPAND PANEL JavaScript code to use:
<script>
$(document).ready(function(){
    $('#colno3').css('height', 'auto');
});
</script>
Repeat this sequence twice to create your Results page and Property Details page:
- In IMAGEPRO control panel, click "Menu" then "Manage Custom Pages"
- Ensure "Select Page" is set as "New Custom Page"
- Give appropriate titles like "Results" and "Details"
- Click "Source" button and paste the Buying Buddy script (same script for all pages)
- Add the appropriate widget code below the script
For the Results page:
<bb-widget data-type="ListingResults"></bb-widget>
For the Property Details page:
<bb-widget data-type="SearchDetails"></bb-widget>
On each page, after the widget code, also paste the EXPAND PANEL JavaScript shown above.

Get Page Links:
After saving each page, note the "Direct Links - Link #1" shown in the top section. Do NOT add these pages to the menu. However, the Link address (URL) is required for your Buying Buddy account setup.
Make a note of "Link-1" for each page (e.g., /102/9983).

Configure Foundation Page Settings:
- In your Buying Buddy dashboard, navigate to
- Click the "Foundation Pages" tab
- Check the page names shown and update them if needed
- Change these to match your actual page addresses from IMAGEPRO (e.g., 102/2983 and 102/2985)
Important: In the input field, do not start with a "/" and only add the page address, not the whole domain name. For example, if your Results page Link-1 is "/102/2983", then add just "102/2983" in the Results page field.

3
Enable Property Sharing
Set up social media sharing with correct listing photos
To allow visitors to share properties from your website on Facebook and other social media platforms with the correct listing photos and details, you'll need to set up a "bb" subdomain for your domain.
Setup Options: You can use either Cloudflare (recommended for free SSL certificates) or your current domain registrar.
The Social Media Sharing Setup Instructions will guide you through both options.
Next Step:
Note: Your Buying Buddy dashboard has customized instructions for your domain in the Installation and Setup section (Social Share Settings tab) of your Buying Buddy account.Widgets - Installation and Setup : Social Share tab
Troubleshooting
SQL Error on Details Page
If you see this message, it's because you're attempting to view the Property Details widget on a page without a reference to a property. Ignore this - the widget is installed correctly and this error is never seen by users.
Staging Domain Authorization
If you see "Sorry this domain is not authorized", the widgets and Plugin JavaScript are working correctly, but your page address is using a domain not authorized to display Buying Buddy widgets.
There are two options:
- Ensure your actual domain name is applied and working, then view the live site
- For extensive development, contact Help Desk to add your IMAGEPRO staging domain as a temporary authorized domain
Next Steps
Your IMAGEPRO site is now ready for advanced Buying Buddy features! Consider adding:
- Featured Listings pages to display your own listings
- Sold properties displays
- Neighborhood-specific property pages
- Lead capture forms connected to Buying Buddy CRM
- Contact forms and custom styling with Widget Themes
For inspiration, view our demonstration sites:
- https://charliesmithrealty.com (WordPress)
- https://charliesmithrealty.net (HTML / PHP)
Need additional help? Contact our support team through your Buying Buddy dashboard.