Updating the JavaScript Plugin When Notified
You will be notified if the JavaScript plugin script needs to be changed.
Estimated time to complete the update: 5-10 minutes.
Note: You will not lose your settings or any widgets that you have added to your website.
We appreciate that re-installing the plugin code can be disruptive, and so updates only occur when there is a significant change needing to be made. Otherwise, normal updates with new capabilities, new functions, new features and fixes are added to the existing JavaScript libraries that automatically update in your website using the existing installed JavaScript plugin script.
However, in the event that we need to make a more comprehensive change, we will notify all customers to manually update the entire Plugin script.
Manually Updating the JavaScript Plugin Script
Follow this process to update the Buying Buddy plugin script on your website.
Before you start, we suggest you remind yourself of where and how the Buying Buddy plugin Script is is added on your website by reviewing "Step-2" of the original Plugin installation instructions for your type of website.
Open the main support article for Installing Buying Buddy plugin and scroll down to see the list of all the website types.
Click the link for your website type (e.g. Squarespace, Duda, Joomla etc) and read step 2.
When you are ready, follow these steps to delete the old Plugin script and replace with the new version. You will not lose your settings or any widgets that you have added to your website.
- Login to your Buying Buddy dashboard.
Click here to go to the Plugin Installation Page
Select your domain to see specific details.
(You will need to repeat this process if you have multiple domains). - Check that your "Website Type" is correct.
The image below shows instructions for a GENERAL HTML site - your instructions will reflect YOUR website type
Then click the "Copy to Clipboard" blue button to copy ALL the code to your clipboard.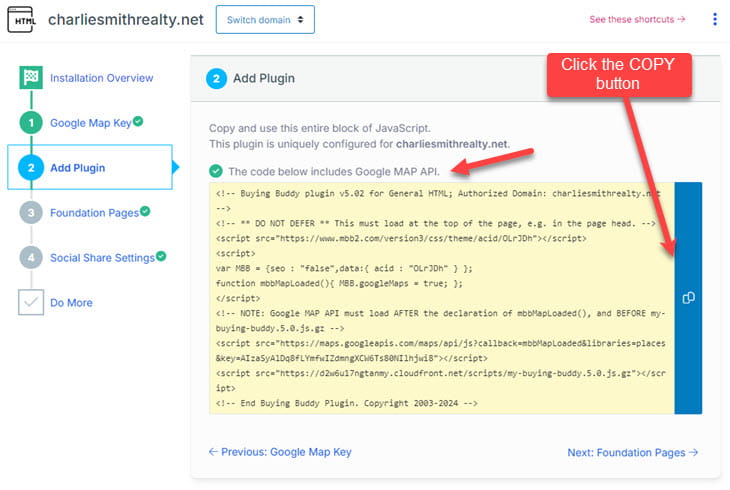
- Now locate where the Buying Buddy plugin script is added to your website
If you haven't already done so, open the support article for Installing Buying Buddy plugin and scroll down to see the list of all the website types.
Click the link for your website type (e.g. Squarespace, Duda, Joomla etc).
Review "Step-2" of the original Plugin installation instructions for your type of website.
Go to your website editor and locate where you added the Buying Buddy plugin script.
For example, in Squarespace, this is located in: Settings > Advanced > Code Injection,
and looks like this:
- Select all the lines of code that are the Buying Buddy plugin.
- Now, in the same place, paste in the new code that is in your clipboard.
Typically this is by using CTRL-V, or right-click your mouse to see "Paste" options.
Look at the code - especially the top line, and confirm that the new version number is correct. - SAVE
- Make sure to clear any website caching services you might be using including any caching plugins or external CDN services like Cloudflare etc.
There may be additional scripts in this area and you must not remove these.
Select everything from (and including) the line that says:
<!-- Buying Buddy Plugin for {yourdomain} --> … all the way to the last line … which should be something like this<!-- End Buying Buddy Plugin -->Then, DELETE this code
Now your plugin script is updated.