There are 2 steps to install and setup Buying Buddy on your WordPress website:
- Get a Google Map API Key.
- Install the Buying Buddy WordPress plugin which is available in the WordPress Plugin Directory
The installation process will also create the required foundation pages.
If you need to create foundation pages manually, see the section below on how to do this.
This article has been updated to reflect changes introduced in version 2.2.4, and provides detailed instructions to guide you through these steps.
Have an easier installation by reading the notices below, then continue down to Step-1.
Updated Widget Syntax
The Widget syntax is updated. The original methods are still supported, but the new preferred methods are as follows:
- Instead of id=, use data-id=
- Instead of filter=, use data-filter=
Support for WordPress Themes
The Buying Buddy WordPress Plugin will work on any WordPress theme.
However, we recommend that you avoid Houzez and similar real estate themes as Buying Buddy will not use layouts from these themes, which can lead to considerable confusion.
See notes for themes below, which includes Real Spaces Theme and DIVI Theme
More details can be found in WordPress Compatibility and Technical Notes.
Also see Troubleshooting WordPress Plugin Issues.

Step 1: Get your Google Map API Key
A Google Map API Key is required for any widget that uses a map. Widget features that do not use the map will function normally without a map key.
You should not postpone getting a Map Key - do this straight away so that everything works and you do not have to repeat this process.
Note: If this is a production or live website, you should obtain a Map Key.
Even if the Google Maps library is being loaded (including a valid API Key) by third party plugin or Theme in you website, you must STILL add your Google Map API Key into the plugin field during installation.
Follow these instructions to Get a Google Map API key.
Step 2: Add Buying Buddy Plugin To Your Site
Install and Activate Plugin:
- Go to your WordPress admin panel.
Select "Plugins / Add New".
- Search for "Buying Buddy".
Install and activate the plugin.
- After successful installation, you will be asked to enter your Buying Buddy Account Activation Key.
Your options are:- Choose "Free Trial" or "Buy Now"
Follow the instructions provided.
At the end of the process, your plugin will be activated. - For existing accounts:
Obtain your Account Activation Key from your Buying Buddy account.
Go to the top menu and click "Widgets" to show the Widgets menu.
You can find your Activation Key on this menu panel - it is shown on the right side at the top. Click the copy button to copy to your clipboard, and then add to the plugin.
- Choose "Free Trial" or "Buy Now"
Add Additional Template Pages
You will now see options to add various template pages.
If you are re-activating the plugin, then you will shown the Plugin Dashboard.
Template pages provide you with examples of how to use various Buying Buddy widgets.
These example pages can be modified or deleted.
The Template Pages tab in the plugin also has options for adding template pages.
Step 3. Add the Disclaimer Widget
You should now add the "Disclaimer Widget" to the Footer so that it shows on every page.
This is not required, however if you don't do this, then the mandatory MLS disclaimer text and terms will be shown directly underneath all widgets. So the "Disclaimer Widget" helps keep your pages clean by showing the required disclaimers in the footer area.
Disclaimer Widget Colors
The widget will display dark gray text on a panel with a white background.
To blend this widget with your website footer, the color of the disclaimer text and panel background can be modified, e.g. white text on a transparent background. Use the Widget Wizard in your Buying Buddy account to create a Disclaimer widget with color options.
See Disclaimer Widget Reference to learn more about this.
To add the Disclaimer widget:
Add this shortcode:[mbb_widget data-id="MBBv3_Disclaimer"]
Installation is complete!
Now the plugin is installed and operational, you can start to use more Buying Buddy widgets on any number of pages to display properties.
Skip to the Doing More section at the bottom of this article.
Additional Plugin Settings
The following settings are shown in the Buying Buddy Plugin Settings tab.
See instructions below:
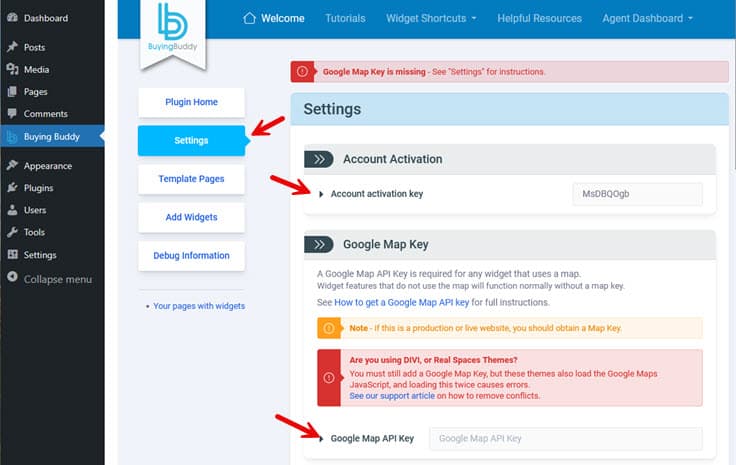
Required Settings
- Activation Key
This field is required. - Google Map API key
A Google Map API Key is required for any widget that uses a map. Widget features that do not use the map will function normally without a map key.
Note: If this is a production or live website, you should obtain a Map Key.
Even if the Google Maps JavaScript library is being loaded (including a valid API Key) by third party code in you website, you must STILL add your Google Map API Key here.
If your WordPress theme loads Google Maps (e.g. DIVI Theme, Real Spaces etc) you must still add a Google Map API key to the Buying Buddy plugin.
Optional Settings
Enable Agent / Office Index Widget?
This widget uses rewrite rules to create multiple SEO friendly pages for Agent, and so it needs to be added to the designated slug "/team". However, if this slug is in use by a non-Buying Buddy function then turn this off to avoid conflicts.
With Version 2.2.4, the following settings are no longer provided:
- Buying Buddy Loads Google Maps Library?
The Buying Buddy plugin will always load the Google Maps API JavaScript unless this is detected as being loaded by a separate plugin - Load the Buying Buddy Plugin
To stop the plugin from loading, de-active it from the Plugins panel. - Only load plugin on these page/post IDs:
This option is no longer available. - Enable auto updates?
The plugin is configure to auto-update. Make sure your settings allow for auto-updates.
Adding Foundation Pages Manually
Step 1: Create pages
Create two (2) new pages that are required for the correct operations of the Buying Buddy plugin.
A third foundation page is added by the plugin for future use, but if you are creating these manually then only 2 are currently required
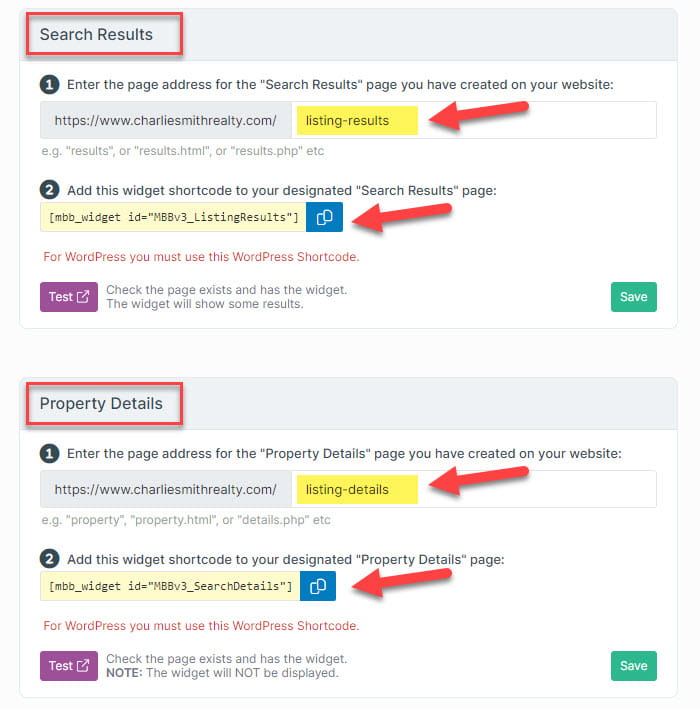
- Results Page
- Property Details Page
These pages should NOT be added to your main navigation menu - i.e. these are "utility" pages.
(You will use other widgets to display properties on other pages such as featured listings, or community pages and so on).
- Go back to your WordPress dashboard account and create two BLANK PAGES.
We suggest you give them appropriate titles, such as "Results" and "Details".
To match the default slugs we use in your Buying Buddy account, give these pages slugs of "/listing-results" and "/listing-details".
However these slugs can be anything you like as long as they match the Website Settings (see 3c. below).
Step 2: Add Widgets to the 2 Foundation Pages you just created
- Next, edit the new "results" page.
- Paste the following short code for the Buying Buddy "Results" widget.
For example – in the image below this is the Results widget added using the block editor.
If you are using a standard text editor, just add the short code as regular text.[mbb_widget data-id="MBBv3_ListingResults"]
- SAVE your page.
- VERIFY. Once you have SAVED this page, preview it to see Buying Buddy results widget being displayed on the authorized domain.
If you are viewing a staging domain and you don't see widgets, make sure this has been added to your Buying Buddy account (submit a help ticket if you need this added).
Excellent! You have set up the Results Foundation Page. - NOW REPEAT the above steps to setup your Details page ** Do not forget to do this! **
The Widget short code to use is:[mbb_widget data-id="MBBv3_SearchDetails"]
Note: The details widget may display a SQL error if you preview it - ignore this.
Excellent! You have now set up the Details Foundation Page. - Finally, paste the Search Form widget to any other page (must be a separate page) using the process described above (this is for testing the search - this is not a foundation page).
(Do not add the search widget to your "results" or "details" pages as this will break the widgets.)
The Search form short code is:[mbb_widget data-id="MBBv3_SearchForm"]
Before testing - complete the next step!
Step 3: Configure your Buying Buddy account so that page names match
It's important that the Buying Buddy system knows the page address you used for your Foundation Pages.
Buying Buddy needs to know where to go to show search results, and where to direct your leads (via emails etc.) to see search results and details of a specific property.
So in this step, you will update the Foundation Page settings in your Buying Buddy dashboard, to match the actual page addresses you created.
- In your Buying Buddy dashboard, navigate to Plugin Installation and Settings.
Then select the domain. - Click the "Foundation Pages" tab to review the page addresses of the Foundation pages.
- Check the page names shown and update them if needed.
- You will see that they are probably shown as /listing-results and /listing-details. If the details and results pages are using different slugs, then you need to change these to say the actual names of the pages you created. When viewing these pages in your browser you will see the full address.
NOTE: Use the actual page names for YOUR site - don't assume that they are the same as shown in this example!
Troubleshooting
"SQL Error" on Details Page
If you see this message then this is because you are attempting to view the Property Details widget on a page on its own without a reference to a property! Ignore this, the widget is installed correctly and this error is never seen.
"Sorry this domain is not authorized"
If you see a message that says "Sorry this domain is not authorized", then this means that the Widgets and Plugin are indeed working correctly, BUT that your page address is a domain that is not authorized to display Buying Buddy Widgets. It is probably a staging / development domain.
There are two options for dealing with this:
- Make sure your actual domain name is applied and working - and then view the "live" site in which case widgets will be displayed correctly. You can then choose to ignore this message while in development.
- If you need to do more extensive development then you can request (via Help Desk) to add your staging / development domain as an extra (free) "authorized" domain on your account.
We call this a 'sandbox' development URL and it would be authorized temporarily while you do development.
Widget Layout Is Jumbled and Unorganized?
See Troubleshooting WordPress Plugin Issues.
Enable Automatic Updates
The Buying Buddy plugin is regularly updated with new features and improvements. You should enable Automatic Updates.

Doing More
Your WordPress site editor will allow you to create custom search forms and use all the capabilities of the Buying Buddy widgets.
Some example that you may like to consider include;
- Adding a Featured Listings page to display your own listings
- Showing your Sold properties
- Creating neighborhood pages with properties for neighborhoods
- Adding lead capture forms that send leads directly to the Buying Buddy CRM
- Adding a general contact form widget
- and a lot more!
You can now use Widget Themes to style widgets - or even add custom CSS too if you wish to.
See our demonstration websites for ideas and inspiration
- https://charliesmithrealty.com (WordPress)
- https://charliesmithrealty.net (HTML / php)
Additional Support Articles
- WordPress Compatibility and Technical Notes
- Troubleshooting WordPress Plugin Issues
- How to Display Properties on Web Pages and Blog Articles. Learn how to use the Widget Wizard to easily get code snippets to display any properties on any pages.
- How to setup IDX widgets to be super search engine friendly! Get SEO friendly Long Tails and Indexable Listings