
This guide will walk you through installing and setting up Buying Buddy on your Squarespace website. The process involves three main steps that we'll cover in detail.
Important: You must have at least a Squarespace Business plan to install Buying Buddy.
Helpful Squarespace resources:
Important Notes Before You Begin
Built-in Domain Authorization: When working in the Squarespace editor, your site displays using a built-in domain like "halibut-bulldog-3xb6.squarespace.com". If you see "Sorry this domain is not authorized", the widgets are working correctly but need this domain added to your account. Contact support to add your built-in domain as a staging domain.
Squarespace 7.1 Users: Use the Fluid Engine editor when adding code blocks to ensure perfect responsive behavior. If you see an "Upgrade" button when editing a section, use it to enable the Fluid Engine editor.
Disable AJAX if needed: Buying Buddy may not function correctly on sites with AJAX enabled. If widgets load initially but disappear when navigating between pages, disable AJAX in your template settings.
Avoid Overlapping Blocks: Do not overlap code blocks containing widgets with other content blocks (like headings or text). This prevents user interaction with buttons and forms.
Installation Steps
1
Add Buying Buddy Plugin to Your Site
Install the JavaScript library site-wide
Critical: The plugin JavaScript should only be added ONCE using Website Tools → Code Injection. Never add it to individual pages or use page-level code injection.
Get Your Plugin Code:
- In your Buying Buddy dashboard go to Installation and Setup
- Select your website and ensure it's set as a Squarespace site on the "Get Ready" tab
- Go to the "Add Plugin" tab and copy the JavaScript code

Install the Plugin:
- In your Squarespace editor, go to Website → Pages → Website Tools → Code Injection
- Paste the Buying Buddy JavaScript code in the HEADER section
- Click SAVE

Add the Disclaimer Widget (Recommended):
While in Code Injection, add the disclaimer widget to the FOOTER section to keep your pages clean:
<bb-widget data-type="Disclaimer"></bb-widget>
This displays required MLS disclaimers in your footer instead of under each widget. You can customize colors using the Widget Wizard.

2
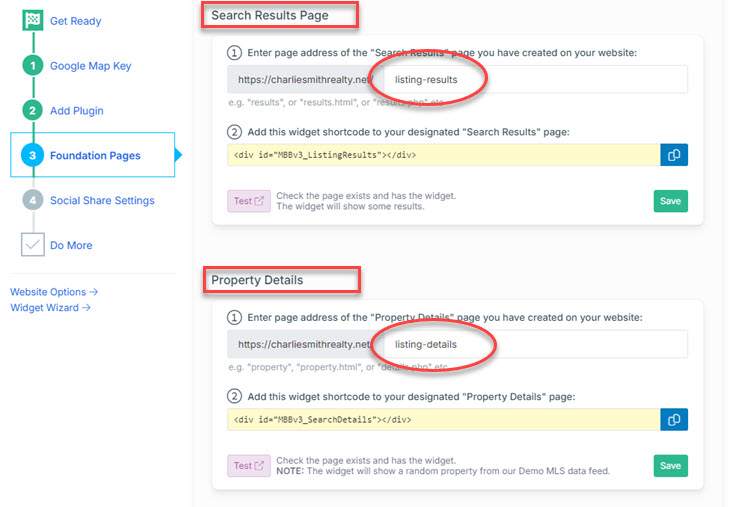
Create Foundation Pages
Set up required Results and Details pages
Important: Create 2 "Not Linked" pages, add the correct widget to each page (only one widget per page), and ensure page addresses match your Buying Buddy account settings.
Create the Pages:
- In Squarespace, go to Website → Pages
- Under "Not Linked", create two new pages:
- "Results" with URL slug: listing-results
- "Details" with URL slug: listing-details - To set URL slugs: hover over page name → click cog icon → edit "URL Slug"


Add Widgets to Pages:
Remember: Only use Code Blocks (not Embed blocks), never add widgets via code injection, and make code blocks full-width for best results.
For the Results page:
- Edit your "Results" page
- Add a Code block and make it full-width
- Paste this code:

<bb-widget data-type="ListingResults"></bb-widget>

For the Details page:
- Edit your "Details" page
- Add a Code block and make it full-width
- Paste this code:
<bb-widget data-type="SearchDetails"></bb-widget>
Add a Search Form (for testing):
Create a search form on any other page (not on Results or Details pages) using:
<bb-widget data-type="SearchForm"></bb-widget>
Confirm Foundation Page Settings:
- Return to your Buying Buddy dashboard
- Go to
- Verify page addresses match your URL slugs:
- Results: /listing-results
- Details: /listing-details - Update if needed to match your actual page slugs
3
Enable Property Sharing
Set up social media sharing with correct listing photos
Recommended Approach: We recommend using the Cloudflare option in the setup instructions below, even if your domain is registered at Squarespace.
To allow visitors to share properties from your website on Facebook and other social media platforms with the correct listing photos and details, you'll need to set up a "bb" subdomain for your domain.
Setup Options: You can use either Cloudflare (recommended for free SSL certificates) or your current domain registrar.
The Social Media Sharing Setup Instructions will guide you through both options.
Next Step:
Note: Your Buying Buddy dashboard has customized instructions for your domain in the Installation and Setup section (Social Share Settings tab) of your Buying Buddy account.Widgets - Installation and Setup : Social Share tab
Troubleshooting
Domain Authorization Issues
If you see "Sorry this domain is not authorized":
- For live sites: Ensure your actual domain name is applied and working, then view the live site
- For development: Contact support to temporarily add your Squarespace staging domain (like "subdomain.squarespace.com") as a free authorized domain
AJAX Compatibility
If widgets load initially but disappear when navigating between pages, your template likely has AJAX enabled. Disable AJAX in your template settings.
Next Steps
Your Squarespace site is now ready for advanced Buying Buddy features! Consider adding:
- Featured Listings pages for your properties
- Sold properties displays
- Neighborhood-specific property pages
- Lead capture forms connected to Buying Buddy CRM
- Contact forms
- Custom styling with Widget Themes
For inspiration, view our demonstration site: https://charliesmithrealty.net
Need additional help? Contact our support team through your Buying Buddy dashboard.