
This guide will walk you through installing and setting up Buying Buddy on your Weebly website. The process involves three main steps that we'll cover in detail.
Special Notes for Weebly: When you add a custom HTML element, the Weebly system puts this code into a layout block that has a setting to stop content from overflowing. This can prevent interaction on some widgets. For example, the Quick Search widget using the "max-min" price selector drop-down will be cut-off or show odd behavior. We have included JavaScript solutions at the end of this article to help you fix this.
Installation Steps
1
Add Buying Buddy Plugin to Your Site
Install the JavaScript library site-wide
Get Your Plugin Code:
- In your Buying Buddy dashboard go to Installation and Setup
- Select your website and ensure it's set as a Weebly site on the "Get Ready" tab
- Go to the "Add Plugin" tab and copy the JavaScript code

Install the Plugin:
- In your Weebly account, click the button to Edit Site
- In the top menu, click Settings
- Go to the SEO menu and scroll down to find the panel for entering "Header Code"
- Paste the Buying Buddy JavaScript code into this panel and click SAVE

Success: By adding the JavaScript like this, the Buying Buddy plugin now loads automatically on every page so that any Buying Buddy widgets will display. This script only "enables" functions to work - you won't see anything changed on your site just yet!
Add the Disclaimer Widget (Recommended):
While you are still in the SEO settings, add the disclaimer widget to the footer code so it shows on every page. This keeps your pages clean by showing required MLS disclaimers in the footer area instead of under each widget.
<bb-widget data-type="Disclaimer"></bb-widget>
This displays dark gray text on a white background by default. To blend with your website footer, you can customize colors using the Widget Wizard.
2
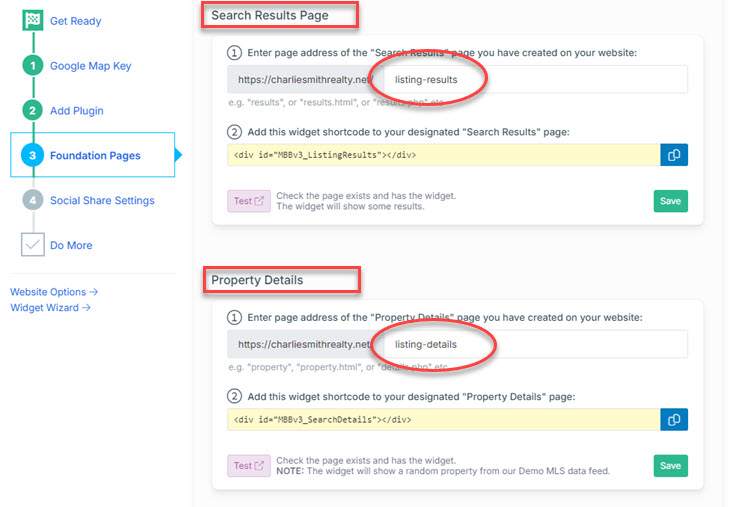
Create Foundation Pages
Set up required Results and Details pages
Important: Create 2 pages that should NOT be in your menus (they are reserved for use by Buying Buddy). Add the correct widget to each page (only one widget per page). Ensure these page addresses match your Buying Buddy account settings.
Create the Pages:
- Go back to your Weebly site editor
- From the top menu, click Pages
- Click the "+" to add a new page and select "standard" page
- Create two pages with these settings:
- Results page with URL slug: listing-results
- Details page with URL slug: listing-details - For both pages:
- Check "Hide in navigation"
- Set header option to "no header"
- Ensure visibility is set to "public"

Add Widgets to Pages:
Tip: The "results" and "details" widgets look best when placed in a container that can be the full width of the browser. Use "Embed Code" elements, not "Embed" blocks.
For the Results page:
- Edit your "Results" page and click Build in the top menu
- Drag the "Embed Code" element from the Build options
- Click the element and select "Edit Custom HTML"
- Paste this code:
<bb-widget data-type="ListingResults"></bb-widget>
For the Details page:
- Edit your "Details" page and click Build in the top menu
- Add an "Embed Code" element and paste this code:
<bb-widget data-type="SearchDetails"></bb-widget>
Add a Search Form (for testing):
Create a search form on any other page (not on Results or Details pages) using:
<bb-widget data-type="SearchForm"></bb-widget>
Note: Widgets will not be visible until you view the published site. In the editor, your page may look empty, but if you hover over the element you should see the Embed Code block highlighted.
Confirm Foundation Page Settings:
- Return to your Buying Buddy dashboard
- Go to
- Verify page addresses match your URL slugs:
- Results: listing-results
- Details: listing-details - Update if needed to match your actual page slugs
3
Enable Property Sharing
Set up social media sharing with correct listing photos
To allow visitors to share properties from your website on Facebook and other social media platforms with the correct listing photos and details, you'll need to set up a "bb" subdomain for your domain.
Setup Options: You can use either Cloudflare (recommended for free SSL certificates) or your current domain registrar.
The Social Media Sharing Setup Instructions will guide you through both options.
Next Step:
Note: Your Buying Buddy dashboard has customized instructions for your domain in the Installation and Setup section (Social Share Settings tab) of your Buying Buddy account.Widgets - Installation and Setup : Social Share tab
Troubleshooting
Widgets Not Fully Displaying - Content Cut Off
When you add a custom HTML element, the Weebly system puts this code into a layout block that prevents content from overflowing. This can cut off dropdown menus and other interactive elements.
The solution is to add JavaScript to allow widget content to overflow normally. See the example at the bottom of this article.
Domain Authorization Issues
If you see "Sorry this domain is not authorized":
- For live sites: Ensure your actual domain name is applied and working, then view the live site
- For development: Contact support to temporarily add your Weebly staging domain as a free authorized domain
"SQL Error" on Details Page
If you see this message when viewing the Property Details page directly, this is normal. The widget is installed correctly - this error only appears when viewing the page without a property reference.
Next Steps
Your Weebly site is now ready for advanced Buying Buddy features! Consider adding:
- Featured Listings pages to display your own listings
- Sold properties displays
- Neighborhood-specific property pages
- Lead capture forms connected to Buying Buddy CRM
- Contact forms
- Custom styling with Widget Themes
For inspiration, view our demonstration sites:
- https://charliesmithrealty.com (WordPress)
- https://charliesmithrealty.net (HTML / PHP)
Fixing the Overflow Problem
If Buying Buddy widgets are being cut off or prevented from displaying correctly, this is typically because the "custom html" element has settings to prevent content from overflowing.
Common elements that typically have overflow hidden include:
- #banner (top of page banner section)
- The <div> wrapper that contains the custom HTML
- .wsite-section-bg-video (the wrapper for background video)
Example JavaScript Solution
Add this JavaScript after your widget code to fix overflow issues. You'll need to inspect your page code to find the specific div IDs or classes that need modification:
<bb-widget data-type="QuickSearch" data-filter="formType:simple1"></bb-widget>
<script>
$("#banner").css("overflow", "visible");
$("#934796931539956411").css("overflow-y", "visible");
$(".wsite-section-bg-video").css("overflow", "visible");
</script>
Need assistance identifying the specific elements causing issues? Contact our support team through your Buying Buddy dashboard.