Multiple leads can be added to your account via import of a correctly structured CSV file. This process starts by clicking the Add Leads from CSV option on the Add a Lead panel, or from the Lead Import Settings page.
Once you have imported leads, see the "Import Status Report" , which will show you:
- The status of the import.
- Option to "REMOVE" all the leads you just imported - in case you need to do it again (see below).
A CSV template file is provided that you can download and use, which will help ensure that your data can be imported. The actual import process should take 5 to 20 minutes at most. If the process does not complete within half an hour please let us know so we can help you get your leads imported.
Preparation and Planning
When you initially import leads, there is a great opportunity to setup your leads with additional information, and then send them all a common email or add them all to a common drip campaign.
A. On a lead-by-lead basis in your original CSV file, for example:
- Add categories and tags to each lead
- Add sales forecast details for each lead
- Specify a star "rating" for each lead
- Assign each lead
B. Or, some information and actions can be applied to ALL the imported lead records in Step-3, for example:
- Apply additional common Tags to all imported leads
- Specify a STAR rating for each lead if none is set on a lead record
- Send a common email to all imported leads
- Attach a common drip campaign to all imported leads
- Assign leads to one of your agents (for multi-user)?
Create a CSV file
The best approach is to download the template CSV file on the import page and use this as a basis for assembling your data.
Click here to download a CSV template file.
For a full explanation of these fields and how to use them, read Import API Field Reference. All fields are optional however if there is no first or last name then the record will be skipped.
Fields in RED: Be careful to understand the values that are required in these fields.
| Field Name | Format | Notes On Use |
|---|---|---|
| First Name | plain text | Mandatory - either First Name or Last Name must be specified |
| Middle Name | plain text | Any text, initials etc |
| Last Name | plain text | Mandatory - either First Name or Last Name must be specified |
| plain text | ||
| Phone | plain text | |
| Mobile Phone | plain text | |
| Work Phone | plain text | |
| Fax | plain text | |
| Company | plain text | |
| Job Title | plain text | |
| Address | plain text | |
| Address 2 | plain text | |
| City | plain text | |
| State | plain text | |
| Zip Code | plain text | |
| Tags | Comma separated list of keywords(tags) | Comma separated list of tags e.g. "fishing, golf, buyer, friend, first time buyer" You can also apply additional common Tags to all leads in Step-3 |
| Rating | blank, or number (1,2,3,4,5) | This sets the STAR rating for a lead If this is left blank then you can set this for all leads in Step-3. |
| mbbuser | characters | For a Multi-User account, then you can "Assign the lead" by specifying the "Referral ID" for a user / agent in your account - e.g. "sfsGGhbv" |
| Category ID | Comma separated list of category ID numbers | Use Category IDs not the "Category name". IDs can be found in "Manage Groups and Categories" admin page in LAC. Categories MUST BE ADDED TO YOUR ACCOUNT BEFORE YOU ATTEMPT TO IMPORT. |
| Lead Type ID | A single valid number | Numeric value: 1=New Lead (default value), 2=Prospect, 4=Client, 10=Past Client, 15=Referral Partner, 20=Sphere, 90=Archived |
| Signup Method | A single number (1,2,3 .. etc) | Numeric value: 1=Manual Entry, 2=Create Account, 3=Save Search, 4=Save Listing, 5=Lead Capture Form, 6=API Import, 7=SPS Generated Lead, 8=Mobile Registration, 9=CSV Import, 10=Zillow Tech-connect API, 11=Realtor.com, 12=Homes.com |
| Sign Up Page URL | URL | URL where lead signed up. For example "www.mydomain.com" |
| Campaign Source | plain text NO SPACES | Your Ad Campaign Source reference, e.g. "Radio_Campaign_September" |
| Buying Time Frame | A single number (1,2,3,4,5) | 1="Now", 2="Within 3 months", 3="3 to 6 Months", 4="6 to 12 months", 5="More than a year" |
| Mortgage Status | A single number (1,2,3) | 1=Need one, 2=Prequalified, 3=None |
| Agent Agreement | A single number (1 or 0) | blank / 0=Not sure or does not have an agent agreement in place, 1=Does have agent agreement in place |
| Global Optout | blank or "Y" | Setting this value to be "Y" will ensure lead received NO communications |
| Additional Contact First Name | plain text | |
| Additional Contact Last Name | plain text | |
| Additional Contact Email | plain text | |
| Additional Contact Phone | plain text | |
| Additional Contact Relationship | plain text | |
| Additional Contact CC on Alerts | blank or "Y" | Set this value to be "Y" to receive alerts |
| Sales Forecast Pipeline Status | number | This is the Sales Step - a numeric step number comes from the first column in: CRM Settings > Sales Steps |
| Sales Forecast Revenue | plain text | For example 4000 |
| Sales Forecast Closing Date | mm/dd/yyyy OR yyyy-mm-dd | You MUST correctly format the DATE in your CSV or the import will fail. For example 09/22/2015 or 2015-09-22 Notice the use of forward slashes "/" in the one format - and dashes "-" in the other. |
| Comments | plain text | Imported to the Lead's "sticky notes / comments" field on the lead profile. (This is NOT a "note" that is shown in the lead history). NOTE (as of July 2-18) - Special characters (including "line breaks") will be imported but may not be displayed correctly when viewed in the LAC. |
All other columns will be ignored.
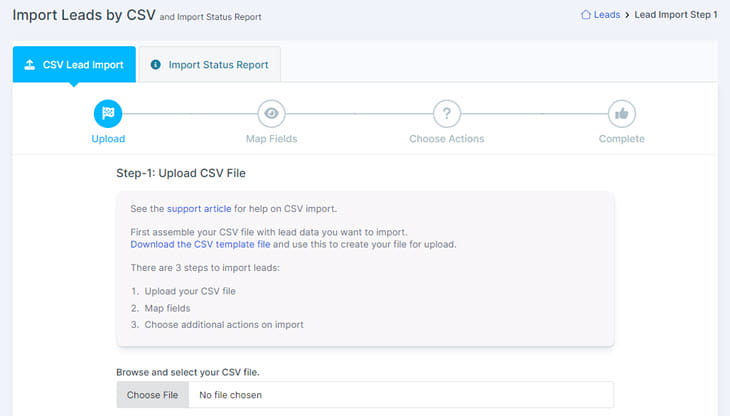
Step-1: Upload and Confirm Fields
Click the option to "Import Leads From A CSV File".
In Step-1
- Click "choose File" to select the CSV file with your leads
- Then continue to Step-2
Step-2: Match Data Columns
Once your CSV file is uploaded, you will be given the opportunity to confirm that your data fields are correctly matching system fields before proceeding.
Adjust the headings in the table so ensure that each column is correctly labeled.

Step-3: Confirm Import Settings
Step 3.1 Analysis
The first panel you will be shown is an analysis of the CSV file.
Step 3.2 Import Actions for All Leads
The last step allows you to see a summary of the leads found and allow you to make the following decisions (which will apply to all leads being imported):
- Associate a Website
All leads need to be associated with an authorized domain. - Who to assign leads to
- Send a specific email (from your templates) to all the leads (good option if you want to send a customized 'welcome' message to new leads)
- Attach a common Drip Campaign (good option if you want to send a sequence of multiple custom messages)
- CC emails to additional contacts
- Set a Star Rating
- Set additional common lead tags. These can be existing or new tags.
- Set a common password
- Send any notifications
If you already have a large number of leads in your CSV file, and they are already assigned to agents in your Team, setup those agents as Users in your Leads and Contacts account, and replace the Agent's name with their User Referral ID. This is shown in the LAC on the Users Profile page under their photo.
Once your leads are imported, you will receive a notification email.
Import should take 5 to 20 minutes at most. If the process does not complete within half an hour please let us know so we can help you get your leads imported.