This guide will walk you through installing and setting up Buying Buddy on your Joomla website. The process involves three main steps that we'll cover in detail.
JCE Editor Users: If you use the JCE Editor, please set the "Validate HTML" option to "No" in the Editor Global Configuration. If you do not do this, the JCE Editor will remove all the "filter" statements that customize your widgets.
Get SEO Indexable Content with the Buying Buddy SDK For PHP
An optional SDK is available for advanced PHP programmers that allows you to update the page HTML with values coming from the API. See Buying Buddy PHP Class and API.
This method provides the benefits of allowing you to make pages very SEO friendly and also pre-populate fields and forms with MLS field values.
Installation Steps
1
Install Buying Buddy Plugin
Download and install the Joomla plugin
Download the Plugin:
- In your Buying Buddy dashboard go to Installation and Setup
- Select your website and ensure it's set as a Joomla site on the "Get Ready" tab
- Go to the "Add Plugin" tab and download the Joomla v3 or v4 plugin ZIP file. Do not unzip!

Install the Plugin:
Note: The following instructions and screenshots were created for Joomla v3 and should be used as a reference if you are installing the plugin for Joomla v4.
- In your Joomla Admin panel, navigate to Extensions → Manage → Install
- Upload the Buying-Buddy_Joomla.zip file (or Buying-Buddy_Joomla-4.zip for Joomla 4)

Configure the Plugin:
- In your Joomla Admin panel, navigate to the Plugins Administration area
- Search for "Buying Buddy" and click the plugin name to see the settings
- On the settings panel, enter your Account Activation Key.
- ENABLE the plugin
- Click Save & Close

Where to find your keys:
- You can obtain your Account Activation Key from within your Buying Buddy account in menu item.
Your Activation Key is shown at the top-right of the dropdown menu
2
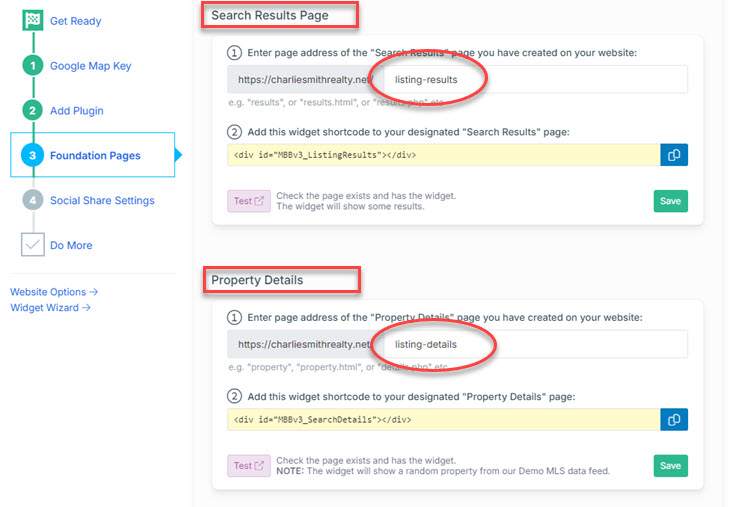
Create Foundation Pages
Set up required Results and Details pages
Important: Create 2 pages that should NOT be in your menus (they are reserved for use by Buying Buddy). Add the correct widget to each page (only one widget per page). Ensure these page addresses match your Buying Buddy account settings.
Create the Pages:
- In your Joomla account, create 2 extra pages:
- Results with slug: /listing-results
- Details with slug: /listing-details - Create an Article/K2 Item/SP Page Builder page for each
- Create menu items linked to these pages with appropriate titles
- In the menu item settings, go to the Link Type tab and turn off Display in Menu
Add Widgets to Pages:
Recommended: Use the Sourcerer Joomla Extension to paste widget codes into your pages. Make sure your editor is in "Code" mode when adding widgets.
Editor Setup:
If using JCE Editor, change to code mode:

If using Tiny MCE Editor, change to Source Code view:

For the Results page:
- Edit your "Results" page
- Paste this code:
<bb-widget data-type="ListingResults"></bb-widget>
For the Details page:
- Edit your "Details" page
- Paste this code:
<bb-widget data-type="SearchDetails"></bb-widget>
Note: The details widget may display a SQL error if you preview it - ignore this. The widget is installed correctly and this error is never seen in normal use.
If using Sourcerer:
Results widget code:
{source 0}<bb-widget data-type="ListingResults"></bb-widget>{/source}
Details widget code:
{source 0}<bb-widget data-type="SearchDetails"></bb-widget>{/source}
Add a Search Form (for testing):
Create a search form on any other page (not on Results or Details pages) using:
<bb-widget data-type="SearchForm"></bb-widget>
Clear Cache: After adding widgets, clear Joomla's cache and expired cache to ensure the most current version is being served. See Joomla's Documentation for instructions.
Confirm Foundation Page Settings:
- Return to your Buying Buddy dashboard
- Go to
- Verify page addresses match your URL slugs:
- Results: /listing-results
- Details: /listing-details - Update if needed to match your actual page slugs
Add the Disclaimer Widget (Recommended):
Add the disclaimer widget to your Footer so it shows on every page. This keeps your pages clean by showing required MLS disclaimers in the footer area instead of under each widget.
<bb-widget data-type="Disclaimer"></bb-widget>
This displays dark gray text on a white background by default. To blend with your website footer, you can customize colors using the Widget Wizard.
3
Enable Property Sharing
Set up social media sharing with correct listing photos
Important: If you are using the SDK for PHP, this section does not apply. The SDK will enable the writing of META data on the server to create property details pages with relevant META data that is needed for Social Share (and SEO).
For standard Jooma! installations (not using the SDK), you'll need to configure social sharing settings to ensure property listings display correctly when shared on social media platforms.
To allow visitors to share properties from your website on Facebook and other social media platforms with the correct listing photos and details, you'll need to set up a "bb" subdomain for your domain.
Setup Options: You can use either Cloudflare (recommended for free SSL certificates) or your current domain registrar.
The Social Media Sharing Setup Instructions will guide you through both options.
Next Step:
Note: Your Buying Buddy dashboard has customized instructions for your domain in the Installation and Setup section (Social Share Settings tab) of your Buying Buddy account.Widgets - Installation and Setup : Social Share tab
Troubleshooting
Some Joomla components will by default strip down any raw HTML, CSS, JavaScript and PHP codes. Below are the most common issues and solutions:
Common Configuration Issues
- JCE Editor: Go to Components → JCE Editor → Profile → Default → Editor Parameters and turn on: "Allow Javascript", "Allow CSS" and "Allow PHP"
- RSFirewall: Go to Components → RSFirewall → Firewall Configuration → Active Scanner and turn off: "Enable active scanner in the /administrator section"
- Editor Settings: If you have default editor set to anything other than "Editor - none" or "Editor - CodeMirror", change the editor to "Code mode" before entering the codes
- SP Page Builder: Use "Raw HTML" instead of "Text Block" to enter the codes
- Mootools Conflict: If you have Mootools plugin installed and are seeing conflict issues, consider removing Mootools. See this guide for instructions
Domain Authorization Issues
If you see "Sorry this domain is not authorized":
- For live sites: Ensure your actual domain name is applied and working, then view the live site
- For development: Contact support to temporarily add your development staging domain as a free authorized domain
"SQL Error" on Details Page
If you see this message when viewing the Property Details page directly, this is normal. The widget is installed correctly - this error only appears when viewing the page without a property reference.
Next Steps
Your Joomla site is now ready for advanced Buying Buddy features! Consider adding:
- Featured Listings pages to display your own listings
- Sold properties displays
- Neighborhood-specific property pages
- Lead capture forms connected to Buying Buddy CRM
- Contact forms
- Custom styling with Widget Themes
For inspiration, view our demonstration sites:
- https://charliesmithrealty.com (WordPress)
- https://charliesmithrealty.net (HTML / PHP)
Need additional help? Contact our support team through your Buying Buddy dashboard.