

This guide walks you through adding Buying Buddy to a Next.js website. Buying Buddy installs as an npm package, @buyingbuddy/react, and its widgets are ordinary React components you place on your pages. Both the App Router and the Pages Router are supported.
There are two ways to install it, and both are covered in full on this page:
- Install with AI prompts - your dashboard generates a short series of ready-made prompts that you hand to a coding assistant such as Claude Code, Cursor or GitHub Copilot, and it does the work for you.
- Install manually - you add the
@buyingbuddy/reactpackage yourself and place the widgets by hand.
Both routes end at the same result. Pick whichever suits how you work - the AI route is the fastest way to get set up, and the manual route gives you a full component reference if you would rather place everything yourself.
You keep control of your own code. Unlike a hosted site builder, nothing here publishes for you. Both routes change files in your project, you review the changes as you normally would, and you deploy when you are ready. Buying Buddy widgets are added as standard <BuyingBuddyWidget> React components.
Is this the right guide? This is for a Next.js project - one with an app or pages directory and a next.config file. If your project is a plain React app built with Vite or Create React App, use Install Buying Buddy in React Applications instead. If your site was built for you by a hosted builder such as Lovable, Replit or GoDaddy Airo, use that builder's own guide - the steps differ.
Before You Begin
- Your Next.js project, and the ability to run
npm installin it. - For the AI route, a coding assistant that can read and edit the project - Claude Code, Cursor, GitHub Copilot, or similar. For the manual route, your own editor is all you need.
- Somewhere to deploy a preview - Vercel, Netlify, or your own host. You cannot preview Buying Buddy widgets on
localhost; see Deploy and Authorize Your Site below for why. - Your Buying Buddy dashboard, with your website's Website Type set to Next.js. (The manual script fallback in Method 2 uses the HTML website type instead - that is noted where it applies.)
Work on a branch. Both routes edit real files in your project. Run them on a branch, or with your work committed, so you can review the changes and roll back if you want to.
Option 1: Install with AI Prompts
The Add Plugin tab of generates four prompts, personalized to your account. Run them in order. Each one shows the full prompt to copy, and a link you can hand to an assistant that is able to fetch a URL.
What the AI Prompts Set Up for You
Step-1 Prompt - Install the Package
Installs @buyingbuddy/react and wraps your app in the <BuyingBuddyProvider> at your shared app root - app/layout.tsx for the App Router, or pages/_app.tsx for the Pages Router. It adds your Activation Key and nothing else: no pages and no widgets yet.
Step-2 Prompt - Create the Foundation Pages
Creates the four pages the IDX system needs - property results, property details, a market report, and a communities hub - at the addresses configured in your account, and adds the MLS disclaimer to your site footer.
Step-3 Prompt - Add Search & Get Your Settings
Adds a property search form to your home page, then measures your site header and hands you an Action Required summary listing the settings to enter in your dashboard.
Step-5 Prompt - Add Recommended Widgets (optional)
Adds further pages you can pick from - a full search page, featured listings, a home valuation form, contact and about pages - plus a register/login bar in your site header.
Installation Steps (AI Route)
1
Run the Step-1 Prompt - Install the Package
Adds the package and the provider
In , open the Add Plugin tab, find the Step 1 card and reveal the full prompt. Copy it and give it to your assistant. When it finishes you should have @buyingbuddy/react in your dependencies and a <BuyingBuddyProvider> at your app root.
Confirm your project still builds before moving on. Your pages should look exactly as they did before - the provider does not change your layout, hide your content, or add a loading screen.
2
Run the Step-2 Prompt - Create the Foundation Pages
Four required pages, plus the footer disclaimer
Copy the Step-2 prompt and run it. It creates the four foundation pages at the addresses your account is configured for, adds the MLS disclaimer to your footer, and puts a link to the communities page in your navigation. It changes nothing else about your menu or layout.
3
Run the Step-3 Prompt - Add Search & Get Your Settings
Home page search, and the values you need next
Copy the Step-3 prompt and run it. It adds a search form to your home page, then ends with an Action Required summary. Keep that summary - the next step uses it.
4
Enter Your Settings
Two places in your dashboard
The values from your Step-3 summary go into two different screens. Both are quick, and neither involves code.
- Widget Header Offset - in on the Add Plugin tab, in Step 4. Enter the Mobile, Tablet and Desktop pixel values from your summary, then click Save Settings. Leave them blank if your site has no sticky or fixed header.
- Deploy Preview URL - in . Enter the hostname you preview your site on, with no
https://. This is what lets widgets load on that address.
You get one Deploy Preview URL per website, so use the deployment you actually want to preview on. If a domain is already in that field you can replace it or leave it as it is.
5
Run the Step-5 Prompt - Add Recommended Widgets (optional)
More pages, and a register/login bar
Once the earlier steps are done and your assistant has gone idle, copy the Step-5 prompt. You choose which of the optional pages to add.
If you add the register/login bar to your header, re-check your Widget Header Offset afterwards. That bar makes the header taller, and it does not appear until your domain is authorized - so a measurement taken before then will be too small. Re-measure once widgets are showing, and update the three values in Step 4.
Option 2: Manual Install
Prefer to add everything yourself? The recommended way is the official package, @buyingbuddy/react. It is built specifically for React and handles the widget lifecycle correctly, including in single-page apps. A manual <script>-based method is also available as a fallback for the rare project that cannot add an npm dependency.
You do not need to look up your Activation Key. The Add Plugin tab of has a Manual Install pane with the npm command and a <BuyingBuddyProvider> snippet already filled in with your key. Copy the snippet from there and use it in Method 1, Step 2 below.
Method 1 - The @buyingbuddy/react Package (Recommended)
An npm package that wraps the Buying Buddy widget in two React components - <BuyingBuddyProvider> and <BuyingBuddyWidget>. The provider loads the Buying Buddy runtime for you, so there is no script tag to add by hand. This is the right choice for virtually every Next.js project.
1
Install the Package
Add the dependency to your project
Inside your Next.js project, install the package (React and React DOM are already present in a Next.js app):
npm install @buyingbuddy/react
Your Personalized Setup Instructions
You do not need to look up your activation key or any other IDs. Your Installation and Setup page - - shows your personalized setup instructions with your activation key already filled in. Copy the <BuyingBuddyProvider> snippet from there and use it in the next step (Step 2).
2
Add the BuyingBuddyProvider
Wrap your app once, at your shared root
Add a single <BuyingBuddyProvider> at your shared app root. It loads the Buying Buddy runtime for your account once, waits for it to initialize, then renders your widgets. Expand the section for your router below.
Copy the ready-made snippet: Your Installation and Setup page shows the <BuyingBuddyProvider> line with your activation key already filled in - copy it from there. In the examples below, activationKey="your-activation-key" is a placeholder for that value.
Use one provider per page. The Buying Buddy runtime installs a single global, so a page should use one provider with one activationKey. A widget rendered outside a provider will throw an error.
Next.js (App Router)
A client provider wrapped around children in the root layout
The provider runs in the browser (it loads a script and reads window), so it must live in a Client Component. Create a small client wrapper, then use it in your server-rendered root layout.
// app/providers.tsx
"use client"

import { BuyingBuddyProvider } from "@buyingbuddy/react"

export default function Providers({ children }) {
    return (
        <BuyingBuddyProvider activationKey="your-activation-key">
            {children}
        </BuyingBuddyProvider>
    )
}
// app/layout.tsx
import Providers from "./providers"

export default function RootLayout({ children }) {
    return (
        <html lang="en">
            <body>
                <Providers>{children}</Providers>
            </body>
        </html>
    )
}
Next.js (Pages Router)
Wrap the app in _app.tsx
Wrap the application in your custom pages/_app.tsx:
// pages/_app.tsx
import { BuyingBuddyProvider } from "@buyingbuddy/react"

export default function App({ Component, pageProps }) {
    return (
        <BuyingBuddyProvider activationKey="your-activation-key">
            <Component {...pageProps} />
        </BuyingBuddyProvider>
    )
}
Tip: Pass a fallback prop to show a loading state while the runtime initializes, for example <BuyingBuddyProvider activationKey="..." fallback={<p>Loading...</p>}>. On a load failure the provider shows its own built-in error message in place of your widgets.
3
Create Foundation Pages
Results, Details, Market Report, and Communities routes
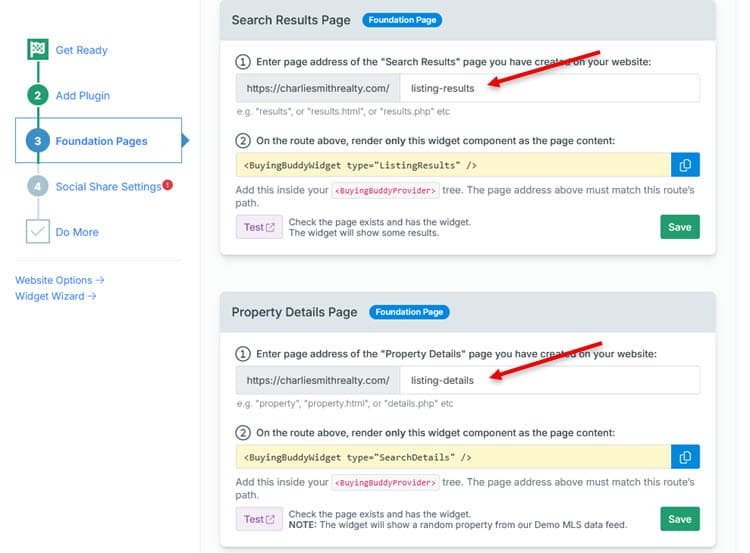
Important: Buying Buddy uses four dedicated "Foundation Pages" - Search Results, Property Details, Market Report, and Communities Hub. The main page content of each must contain only one Buying Buddy widget (its results, details, market report, or communities widget). It is fine to also have the Disclaimer widget in the page footer and login/account widgets in the header. For a full explanation, see Understanding Foundation Pages.
Create four routes in your application, each rendering a single widget. The example uses App Router conventions; the Pages Router equivalent is the same component placed in your pages directory.
// Results route  ->  /listing-results
import { BuyingBuddyWidget } from "@buyingbuddy/react"

export default function ResultsPage() {
    return <BuyingBuddyWidget type="ListingResults" />
}

// Details route  ->  /listing-details
import { BuyingBuddyWidget } from "@buyingbuddy/react"

export default function DetailsPage() {
    return <BuyingBuddyWidget type="SearchDetails" />
}

// Market Report route  ->  /market-area-report
import { BuyingBuddyWidget } from "@buyingbuddy/react"

export default function MarketReportPage() {
    return <BuyingBuddyWidget type="MarketReport" />
}

// Communities route  ->  /featured-communities
import { BuyingBuddyWidget } from "@buyingbuddy/react"

export default function CommunitiesPage() {
    return <BuyingBuddyWidget type="Communities" />
}
Note: SearchResults and ListingResults are interchangeable - both render the same results widget. Likewise SearchDetails and ListingDetails.
Confirm Foundation Page Settings:
- Return to your Buying Buddy dashboard
- Go to
- Verify the page addresses match your route paths:
- Results: /listing-results
- Details: /listing-details
- Market Report: /market-area-report
- Communities Hub: /featured-communities - Update them if your routes use different paths
Important: Do not add a SearchForm or QuickSearch widget to any foundation route (Results, Details, Market Report, or Communities) - this will break widget behavior.
4
Add the Disclaimer Widget
Show the required MLS disclaimer site-wide
Add the Disclaimer widget to a component that renders on every page - typically your site footer or layout - so the required MLS disclaimer appears once, site-wide, instead of under every widget.
// Footer.jsx
import { BuyingBuddyWidget } from "@buyingbuddy/react"

export default function Footer() {
    return (
        <footer>
            {/* ...your footer content... */}
            <BuyingBuddyWidget type="Disclaimer" />
        </footer>
    )
}
5
Add a Search Form & Test
Place a search form and confirm the full flow works
Add a search form to any page other than your Results or Details routes - your home page is a good choice. The type prop maps to the widget's data-type, and filter maps to data-filter.
import { BuyingBuddyWidget } from "@buyingbuddy/react"

// Standard search form
<BuyingBuddyWidget type="SearchForm" />

// Compact one-line quick search
<BuyingBuddyWidget type="QuickSearch" filter="formType:simple1" />

// Featured gallery - 12 of the account's own listings
<BuyingBuddyWidget type="FeaturedGallery" filter="limit:12" />

// Interactive map
<BuyingBuddyWidget type="InteractiveMap" />
App Router note: Pages that render widgets are interactive client components. Either add "use client" to the top of the page, or keep the widget in a small client component imported into a server page - that keeps page-level data fetching on the server while the widget renders on the client.
Test the Full Flow:
- Deploy your app to an authorized domain or your Deploy Preview URL (widgets will not load on
localhost) - Submit a search from the search form - you should land on your Results route with listings
- Click a listing - you should land on your Details route showing that property
- Confirm the Disclaimer appears in your footer
Success: If search, results, details, and the disclaimer all work, your Buying Buddy integration is live. Continue to Enable Property Sharing below.
Method 2 - Manual Install (Script + bb-widget) - Fallback Only
Use Method 1 (the package) whenever you can. This manual method is a fallback for the rare project that cannot add an npm dependency. It is not recommended for single-page apps: the plugin script scans the DOM on load, but React widgets render afterward, and client-side navigation adds and removes them without the script re-scanning - the exact problem the @buyingbuddy/react package was built to solve.
If you do use this method, you will add your personalized plugin script to the page yourself, then place <bb-widget> elements. The overall sequence - plugin, foundation pages, disclaimer, search form, test - is the same as Method 1.
For the manual script method, set your website type to HTML so the dashboard generates the correct personalized plugin script (which already includes your activation key).
- In the top menu, go to Website Options
- Select the Website Settings tab, and in the header click the link to change the website type to HTML
- Open the Installation and Setup page - it will now show your personalized JavaScript plugin (including your activation key) along with the matching instructions
- Copy the plugin JavaScript from the Add Plugin tab
1
Add the Plugin Script Site-Wide
Load it once, in the page head, before widgets mount
The plugin script must load in the <head>, site-wide, and must not be deferred or loaded asynchronously. Use the personalized script you copied above (shown below as YOUR_BUYING_BUDDY_PLUGIN.js). Expand the section for your router.
Next.js (App Router)
Using next/script in the root layout
Add the script in your root app/layout.tsx using Next.js's Script component with strategy="beforeInteractive" so it runs before React hydrates:
// app/layout.tsx
import Script from "next/script"

export default function RootLayout({ children }) {
    return (
        <html lang="en">
            <head>
                <Script
                    src="https://www.mbb2.com/.../YOUR_BUYING_BUDDY_PLUGIN.js"
                    strategy="beforeInteractive"
                />
            </head>
            <body>{children}</body>
        </html>
    )
}
Do not use strategy="lazyOnload" or strategy="afterInteractive". The plugin must be available before widgets mount - beforeInteractive is the correct strategy.
Next.js (Pages Router)
Using _document.tsx
Add the script tag inside the <Head> of your custom pages/_document.tsx:
// pages/_document.tsx
import { Html, Head, Main, NextScript } from "next/document"

export default function Document() {
    return (
        <Html lang="en">
            <Head>
                <script src="https://www.mbb2.com/.../YOUR_BUYING_BUDDY_PLUGIN.js" />
            </Head>
            <body>
                <Main />
                <NextScript />
            </body>
        </Html>
    )
}
Critical: Add the plugin script once only, site-wide. Never add it inside individual page components, and do not modify the plugin code.
2
Render Widgets
Place bb-widget elements in your JSX
With the plugin loaded, you can place widgets. There are two approaches depending on your React version.
React 19 - directly in JSX:
React 19 passes unknown props to custom elements as HTML attributes, so you can write the element directly:
<bb-widget data-type="SearchForm"></bb-widget>
<bb-widget data-type="QuickSearch" data-filter="formType:simple1"></bb-widget>
All React versions - a small wrapper component:
For reliability across every React version, create this wrapper once and import it wherever you need a widget. It creates the <bb-widget> element imperatively and sets its attributes before attaching it to the DOM.
// BuyingBuddyWidget.jsx
import { useEffect, useRef } from "react"

export default function BuyingBuddyWidget({ widgetType, filter, className }) {
    const containerRef = useRef(null)

    useEffect(() => {
        const container = containerRef.current
        if (!container) return

        // Clear any existing widget (handles re-renders and filter changes)
        container.innerHTML = ""

        // Create the element imperatively - attributes are set before
        // DOM attachment, so connectedCallback sees them immediately.
        const widget = document.createElement("bb-widget")
        widget.setAttribute("data-type", widgetType)
        if (filter) widget.setAttribute("data-filter", filter)

        container.appendChild(widget)

        return () => {
            container.innerHTML = ""
        }
    }, [widgetType, filter])

    return (
        <div
            ref={containerRef}
            style={{ width: "100%" }}
            className={className}
            suppressHydrationWarning
        />
    )
}
Then use it like any other component:
import BuyingBuddyWidget from "./BuyingBuddyWidget"

<BuyingBuddyWidget widgetType="SearchForm" />
<BuyingBuddyWidget widgetType="FeaturedList" filter="city:denver+price_min:300000" />
Note: This is the same technique the @buyingbuddy/react package uses internally - the package simply packages it (plus script loading) for you.
3
Foundation Pages, Disclaimer, Search Form & Test
Same sequence as the package method
From here, follow the same sequence as Method 1, using <bb-widget> (or your wrapper) instead of <BuyingBuddyWidget>:
- Foundation pages: create four routes - Results (
<bb-widget data-type="ListingResults">), Property Details (<bb-widget data-type="SearchDetails">), Market Report (<bb-widget data-type="MarketReport">), and Communities Hub (<bb-widget data-type="Communities">) - then confirm the slugs in - Disclaimer: add
<bb-widget data-type="Disclaimer">to your footer/layout - Search form: add
<bb-widget data-type="SearchForm">to a page other than Results or Details - Test: search -> results -> details, and confirm the disclaimer renders
<bb-widget data-type="ListingResults"></bb-widget>
<bb-widget data-type="SearchDetails"></bb-widget>
<bb-widget data-type="MarketReport"></bb-widget>
<bb-widget data-type="Communities"></bb-widget>
<bb-widget data-type="Disclaimer"></bb-widget>
<bb-widget data-type="SearchForm"></bb-widget>
Widget Props Reference
When using the @buyingbuddy/react package, <BuyingBuddyWidget> accepts the following props. Only type is required.
| Prop | Type | Description |
|---|---|---|
type | string | Required. The widget to render, e.g. "SearchForm", "FeaturedGallery", "InteractiveMap". |
filter | string | Property filter as +-joined tokens. See the Filter Parameters Reference. |
className | string | CSS class for the wrapper element. |
id | string | HTML id attribute for the widget. |
onWidgetLoaded | function | Callback fired when the widget finishes loading its content. |
The provider, <BuyingBuddyProvider>, accepts activationKey (required) and an optional fallback rendered while the runtime loads.
Available Widget Types
The table below lists the Buying Buddy widgets in their React form. Pass the value shown to the type prop of <BuyingBuddyWidget> (inside your <BuyingBuddyProvider>). This mirrors the master Published IDX Widget Set - refer to that article for the definitive list.
| Widget | React component |
|---|---|
| Search Form | <BuyingBuddyWidget type="SearchForm"/> |
| Results | <BuyingBuddyWidget type="ListingResults"/> |
| Property Details | <BuyingBuddyWidget type="SearchDetails"/> |
| List of Properties | <BuyingBuddyWidget type="FeaturedList"/> |
| Gallery Display | <BuyingBuddyWidget type="FeaturedGallery"/> |
| Interactive Map | <BuyingBuddyWidget type="InteractiveMap"/> |
| Communities | <BuyingBuddyWidget type="Communities"/> |
| Quick Search | <BuyingBuddyWidget type="QuickSearch"/> |
| Login Panel | <BuyingBuddyWidget type="LoginPanel"/> |
| Lead Capture Form | <BuyingBuddyWidget type="LcForm"/> |
| Market Stats | <BuyingBuddyWidget type="MarketStats"/> |
| Market Report | <BuyingBuddyWidget type="MarketReport"/> |
| Agent / Roster | <BuyingBuddyWidget type="Brokers"/> |
| Agent / Roster (permalinks) | <BuyingBuddyWidget type="OfficeRoster"/> |
| Disclaimer | <BuyingBuddyWidget type="Disclaimer"/> |
| Calculator | <BuyingBuddyWidget type="Calculator"/> |
Note: SearchResults and ListingResults are interchangeable, as are SearchDetails and ListingDetails - each pair renders the same widget. When using the manual method (Method 2), use the same names as the data-type attribute, e.g. <bb-widget data-type="FeaturedGallery"></bb-widget>.
Enable Property Sharing
Set up social media sharing so shared property links show the correct listing photo and details.
For Next.js and single-page apps: Because listing content is rendered client-side, social scrapers won't read per-listing meta tags from your routes. The domain-level setup below ensures shared links resolve to correctly rendered share previews.
To allow visitors to share properties from your website on Facebook and other social media platforms with the correct listing photos and details, you'll need to set up a "bb" subdomain for your domain.
Setup Options: You can use either Cloudflare (recommended for free SSL certificates) or your current domain registrar.
The Social Media Sharing Setup Instructions will guide you through both options.
Next Step:
Note: Your Buying Buddy dashboard has customized instructions for your domain in the Installation and Setup section (Social Share Settings tab) of your Buying Buddy account.Widgets - Installation and Setup : Social Share tab
Deploy and Authorize Your Site
Buying Buddy widgets only load on domains registered to your account. Because you host this site yourself, each hostname you serve it from is authorized separately - a preview deployment and your live domain are two different entries.
- Your live domain is the website already set up in your account.
- Your preview hostname is the one you enter as the Deploy Preview URL in .
Widgets will not work on localhost. Your local development server is not a hostname we can authorize, so widgets stay blank there no matter what you enter. Deploy a preview and view the site on that hostname instead. Blank widgets on a deployed address almost always mean that exact hostname still needs authorizing.
Verify Your Setup
On your deployed preview, check that:
- The search form on your home page loads and returns results.
- Clicking a result opens your property details page.
- The MLS disclaimer appears in your footer on every page.
- Your own header, navigation and footer are unchanged.
- Map widgets are not hidden behind a sticky header - if they are, revisit your Widget Header Offset values.
All checks passing? Your install is complete. Deploy to your live domain when you are ready, and remember that the live domain is authorized separately from your preview - widgets will be blank there until it is.
Troubleshooting
The build fails with an error about createContext
This means your project is pinned to version 0.3.1 or older of the package. Version 0.3.2 fixed it. Run npm install @buyingbuddy/react@latest and build again.
If you must stay on an older version, the workaround is a single new file that re-exports the package behind a "use client" directive, importing BuyingBuddyProvider and BuyingBuddyWidget from that file instead of from the package. On 0.3.2 and later this file is unnecessary and can be removed.
Widgets render an empty container, or stay blank
Two common causes. First, the runtime may not have registered the <bb-widget> custom element before the widget mounted: with the package, make sure your widget is inside <BuyingBuddyProvider>; with the manual method, confirm the plugin script is in the <head> and not deferred. In the browser console, run customElements.get("bb-widget") - if it returns undefined, the runtime has not registered. Second, and more often, the domain you are viewing has not been authorized - check that the hostname in your browser's address bar matches your live domain or your Deploy Preview URL exactly, and remember that localhost cannot be used. Allow a minute or two after saving a new domain.
Widgets, map, or listing photos blocked by a Content-Security-Policy
If your site sets a Content-Security-Policy - common in hardened Next.js templates - the browser blocks Buying Buddy's resources unless each host is explicitly allowed. Because the provider cannot see why a blocked script failed, this often surfaces as a generic "Failed to load BuyingBuddy script" error - or the map and listing photos simply do not render, with no obvious error. Note that Next.js does not add a CSP by default, so if you have not configured one, this is not your issue.
To confirm, open your browser's developer console. CSP violations are logged there, each naming the blocked host and the directive that blocked it. Add each blocked host to the matching directive:
script-srcandconnect-src- the Buying Buddy runtime and its search / property data APIstyle-srcandfont-src- the per-account widget theme stylesheet and its fontsimg-src- widget media, plus your MLS's listing-photo host (this host is specific to your MLS - read the exact value from the console)- Interactive Map: the map host in
script-src,connect-src, andimg-src, plusworker-src 'self' blob:(the map runs in a blob-URL web worker and fails silently without it)
The exact hostnames always appear in the console as blocked requests - use those rather than guessing, since some hosts (your MLS's listing-photo host in particular) vary by account. If you would like a known-good example CSP for a Next.js site as a starting point, contact support through your Buying Buddy dashboard.
"Invalid activation key or unauthorized domain"
The package provider shows this built-in error when the runtime loads but the account/domain check fails. Verify your activationKey is correct and that the current domain is registered to your account. For development, contact support via the Help Desk to authorize your sandbox or staging domain.
"Sorry, this domain is not authorized"
The runtime is loading but the domain is not registered in your Buying Buddy account. For production, verify the domain in . For a preview deployment, add it as your Deploy Preview URL in ; for a sandbox or staging domain, contact support to authorize it.
Hydration errors in Next.js
A hydration mismatch can occur because the widget DOM is created client-side and isn't present in the server-rendered HTML. The package's wrapper already sets suppressHydrationWarning on its container. If you wrote your own wrapper (manual method), add suppressHydrationWarning to the wrapper <div> as shown in Method 2.
Should I add a loading placeholder while widgets load?
No. The provider renders your page immediately and the widgets fill themselves in once the runtime has loaded, so there is no gap to cover. If a developer previously added a fallback to the provider, it no longer does anything and can be removed.
Do listings appear in my page source for SEO?
Not currently. Widgets load their MLS content in the browser, so listing content is not part of the HTML your server sends. Your own page content, titles and metadata are unaffected and remain fully under your control.
Widget loses state when a prop changes
Changing type or filter tears down and rebuilds the underlying widget, which loses in-widget state such as map position, scroll, or form input. This is expected. Avoid changing those props unnecessarily; if parent re-renders are the cause, memoize the props or wrap the widget in React.memo.
Plugin loads more than once
Loading the runtime more than once causes unpredictable behavior. With the package, use a single provider per page. With the manual method, ensure the script appears only in your root layout or _document - never inside page components. Search your codebase for the plugin URL to confirm there is only one instance.
"SQL Error" on the Details page during testing
Viewing the Details route directly, without a property reference, can show a temporary error. This is normal during testing and is never seen by visitors who arrive from a results listing.
Next Steps
Your Next.js site is ready for more Buying Buddy features. Consider adding:
- Featured listing galleries for your own properties
- Neighborhood and community pages
- Lead capture forms connected to the Buying Buddy CRM
- An interactive map search experience
- Custom styling with Widget Themes
Related Resources
- Install Buying Buddy in React Applications - for Vite, Create React App, Gatsby, and Remix
- Understanding Foundation Pages
- Filter Parameters Reference
- Widget Overview
- Published IDX Widget Set
Need additional help? Contact our support team through your Buying Buddy dashboard.