

This guide covers how to add Buying Buddy IDX widgets to a website built with Framer. Framer sites are React under the hood, so Buying Buddy installs as a single code component. You copy the component from your Buying Buddy Installation and Setup page, paste it into Framer once, and then place it on the canvas like any other component — no coding required after the initial paste.
Applies to: Sites built and hosted with Framer. If you are hand-coding a React, Next.js, Gatsby, or Remix application instead, follow Install Buying Buddy Widgets in React Applications, which uses the @buyingbuddy/react package.
Not sure this is you? This article is specifically for the Framer website builder. If your site is built with an AI website builder — such as HighLevel AI Studio, Replit, or GoDaddy Airo — use the ready-made AI prompts on your Installation and Setup page instead.
How It Works
You add one Buying Buddy code component to your Framer project. You copy it from your Installation and Setup page, where it comes pre-filled with your account’s Activation Key. Each time you drop that component on a page, you choose which widget it renders (Search Form, Results, Interactive Map, and so on) from Framer’s property panel — the same way you configure any Framer component. The component loads the Buying Buddy runtime for your account, so there is no separate script to add to your site’s head.
Important Notes Before You Begin
Account: The widgets will not load without a valid Buying Buddy account, and there is no anonymous or "try it" mode. The component you copy from your Installation and Setup page () already contains your Activation Key. Don't have an account yet? Start a free trial or buy a license.
Domain Authorization: Buying Buddy widgets only load on domains registered to your account. On an unauthorized domain you will see a "Sorry, this domain is not authorized" message. This includes your published Framer domain — both the free yoursite.framer.website address and any custom domain you connect. Framer's on-canvas preview may not render live widgets; always test on your published, authorized domain. To authorize a domain (including a staging or preview address), contact support via the Help Desk.
Client-Side Rendering & SEO: Buying Buddy widgets render in the browser after the runtime loads — their content is not part of the initial HTML Framer publishes. Set up social sharing (below) so shared property links resolve to correct previews.
Installation Steps
1
Add the Buying Buddy Component
Copy it from your dashboard and paste it into Framer once
Add it once: The component is added a single time as a code file in Framer. After that, you reuse the same component on every page — there is no per-page script and nothing to add to your site’s head.
Get Your Component Code:
- In your Buying Buddy dashboard, go to Installation and Setup
- Select your website and ensure it is set as a Framer site
- Go to the Add Plugin tab and copy the Framer code component. It already includes your account’s Activation Key, so there is nothing to fill in.
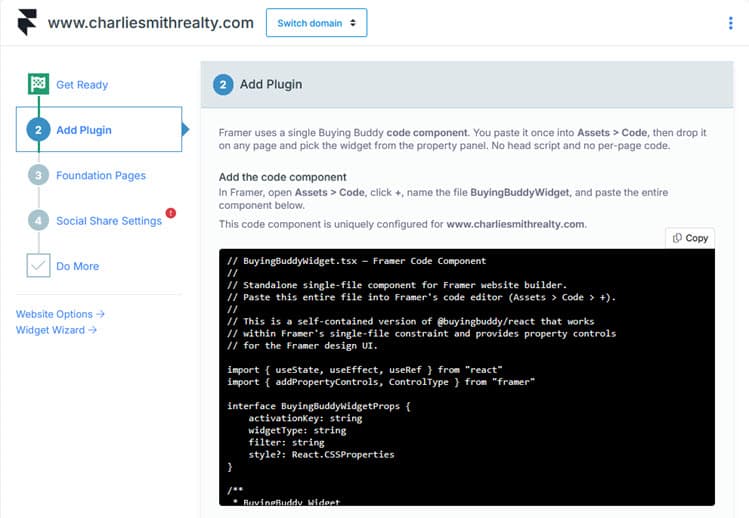
Install the Component in Framer:
- In the Framer editor, open the Assets panel and go to the Code section
- Click the + to create a new code file and name it BuyingBuddyWidget
- Replace the file’s contents with the component you copied, then save. It is now available in your Assets to drag onto any page.
Tip: Copy the whole component, top to bottom, including the import lines and the property-controls block at the end. Those controls are what let you configure each widget from Framer’s design panel.
Add the Disclaimer Widget (Recommended):
Add the Disclaimer widget to a shared footer so it appears on every page. This displays the required MLS disclaimers once in your footer instead of under each widget.
- In your Framer editor, open your shared footer (or any element that appears on every page)
- Place the BuyingBuddyWidget component there
- In the property panel, set Widget Type to MLS Disclaimer
2
Create Foundation Pages
Create each page and add its widget
Important: Buying Buddy uses four dedicated "Foundation Pages" — Search Results, Property Details, Market Report, and Communities Hub. Each must contain only one Buying Buddy widget. It is fine to also have the Disclaimer widget in the footer and login/account widgets in the header. For a full explanation, see Understanding Foundation Pages.
Create the Pages:
In Framer, create four new pages, give each the path shown below, and keep them out of your navigation menu:
- Results page — path /listing-results
- Details page — path /listing-details
- Market Report page — path /market-area-report
- Communities Hub page — path /featured-communities
Add the Widget to Each Page:
On each Foundation Page, place the BuyingBuddyWidget component and set its Widget Type to match the page (only one widget per page):
| Page | Widget Type to set |
|---|---|
| Results (/listing-results) | Search Results |
| Details (/listing-details) | Property Details |
| Market Report (/market-area-report) | Market Report |
| Communities Hub (/featured-communities) | Communities |
Exact instructions per page: Your Installation and Setup page shows the specific widget to add for each Foundation Page. Open the Foundation Pages tab and follow the instructions shown there for each page.
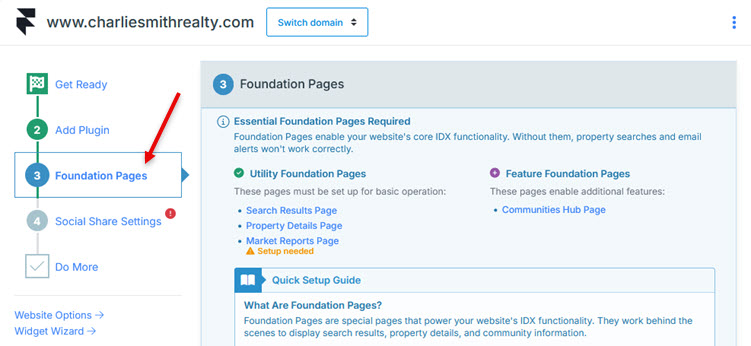
Confirm Foundation Page Settings:
- Return to your Buying Buddy dashboard
- Go to
- Verify the page addresses match your Framer paths, and update them if you used different paths
Important: Do not add a Search Form or Quick Search widget to any of these foundation pages — this will break widget behavior.
3
Add a Search Form, Publish & Test
Confirm the full flow works on your live site
Place the component on a page other than your foundation pages — your home page is a good choice — and set its Widget Type to Search Form. Then publish your Framer site and test on your live, authorized domain.
Test the Full Flow:
- Open your published site on its authorized domain
- Submit a search from the Search Form — you should land on your Results page with listings
- Click a listing — you should land on your Details page showing that property
- Confirm the Disclaimer appears in your footer
Success: If search, results, details, and the disclaimer all work, your Buying Buddy integration is live. Continue to Enable Property Sharing and the optional enhancements below.
Property Controls Reference
Each placed component exposes these controls in Framer's property panel. Only Widget Type is needed to render a widget (the Activation Key is pre-filled from the component you copied); the Filter refines what results-style widgets display.
| Control | What it does |
|---|---|
| Activation Key | Your Buying Buddy activation key (the acid value). Pre-filled from the copied component; change it only if needed. |
| Widget Type | Which widget this instance renders — see the list below. |
| Filter | Property filter as +-joined tokens, e.g. city:denver+price_min:300000, or a form option such as formType:simple1. See the Filter Parameters Reference. |
Available Widget Types
Choose any of these from the Widget Type control. This mirrors the master Published IDX Widget Set — refer to that article for the definitive list and each widget's options.
| Widget Type (in Framer) | Widget |
|---|---|
| Search Form | Search Form |
| Quick Search | Quick Search |
| Search Results | Results |
| Property Details | Property Details |
| Featured Gallery | Gallery Display |
| Featured List | List of Properties |
| Interactive Map | Interactive Map |
| Communities | Communities |
| Lead Capture Form | Lead Capture Form |
| Login Panel | Login Panel |
| Market Stats | Market Stats |
| Market Report | Market Report |
| Mortgage Calculator | Calculator |
| Brokers | Agent / Roster |
| MLS Disclaimer | Disclaimer |
Enable Property Sharing
Set up social media sharing so shared property links show the correct listing photo and details.
For Framer and other single-page apps: Because listing content is rendered client-side, social scrapers won't read per-listing meta tags from your pages. The domain-level setup below ensures shared links resolve to correctly rendered share previews.
To allow visitors to share properties from your website on Facebook and other social media platforms with the correct listing photos and details, you'll need to set up a "bb" subdomain for your domain.
Setup Options: You can use either Cloudflare (recommended for free SSL certificates) or your current domain registrar.
The Social Media Sharing Setup Instructions will guide you through both options.
Next Step:
Note: Your Buying Buddy dashboard has customized instructions for your domain in the Installation and Setup section (Social Share Settings tab) of your Buying Buddy account.Widgets - Installation and Setup : Social Share tab
Troubleshooting
A widget shows "Activation key is required"
The component's Activation Key control is empty — this can happen if the component was hand-typed rather than copied from your Installation and Setup page. Select the component on the canvas and paste your key into the property panel, or re-copy the component from your dashboard.
A widget renders an empty box, or nothing appears
Confirm you are viewing your published site on an authorized domain, not the Framer canvas or an unauthorized preview address. Widgets do not load on unregistered domains. If you need a staging or preview domain authorized, contact the Help Desk.
"Sorry, this domain is not authorized"
The runtime is loading but the domain is not registered to your Buying Buddy account. Verify your domain in , and contact support to authorize any additional preview or staging domains.
The search flow doesn't reach my results or details page
Check that your Framer page paths match the Foundation Page addresses in , and that each foundation page contains only its single Buying Buddy widget.
"SQL Error" on the Details page during testing
Viewing the Details page directly, without a property reference, can show a temporary error. This is normal during testing and is never seen by visitors who arrive from a results listing.
Next Steps
Your Framer site is ready for advanced Buying Buddy features. Consider adding:
- Featured listing galleries for your own properties
- Neighborhood / community pages
- Lead capture forms connected to the Buying Buddy CRM
- An interactive map search experience
- Custom styling with Widget Themes
Related Resources
- Install Buying Buddy Widgets in React Applications — the npm-package approach for hand-coded React projects
- Understanding Foundation Pages
- Filter Parameters Reference
- Widget Overview
Need additional help? Contact our support team through your Buying Buddy dashboard.